What is a Print Ready File?
A print ready file is a file that has been optimised for print. If you run a business, chances are you’ve needed to get things printed like business cards, flyers , and so on. If you had a graphic designer create these files for you, they would have optimised them for print. But if you created the file yourself you may or may not have known that certain things need to be done to ensure that your file prints the best possible quality it can be.
What if I don’t set my file up for print?
You may end up with a low quality looking file, and an unhappy printing company. Some printing companies will double check your file for you, make sure it’s set up correctly and if not, will set the file up for you. This takes extra time, and they will probably do this without charge (so be thankful!). Other printing companies will charge you to set your file up if it hasn’t been already, or they will print it exactly how you’ve supplied it. If it hasn’t been set up correctly you may end with things like:
- Colours printed incorrect or not looking how you expected them to look
- Text or important images cut off because they were to close to the edge of the document
- Blurry text and images because the file resolution wasn’t high enough
- A white border around the edge of your print because bleed wasn’t set up
- Missing fonts because they weren’t outlined in the file
- Incorrect document size, and spelling errors
Some of these may not make much sense, but I have created a guide on setting up documents correctly using InDesign and Illustrator. As well as how to export them for print. You can download the guide here.
Print Ready Business Card Example
Here’s an example of what a print ready file will look like. It’s a business card, but the same principles apply for flyers, brochures, signs etc. I’ve added in the art board line (black) and the margin line (pink) just so you can see how the card has been set up.
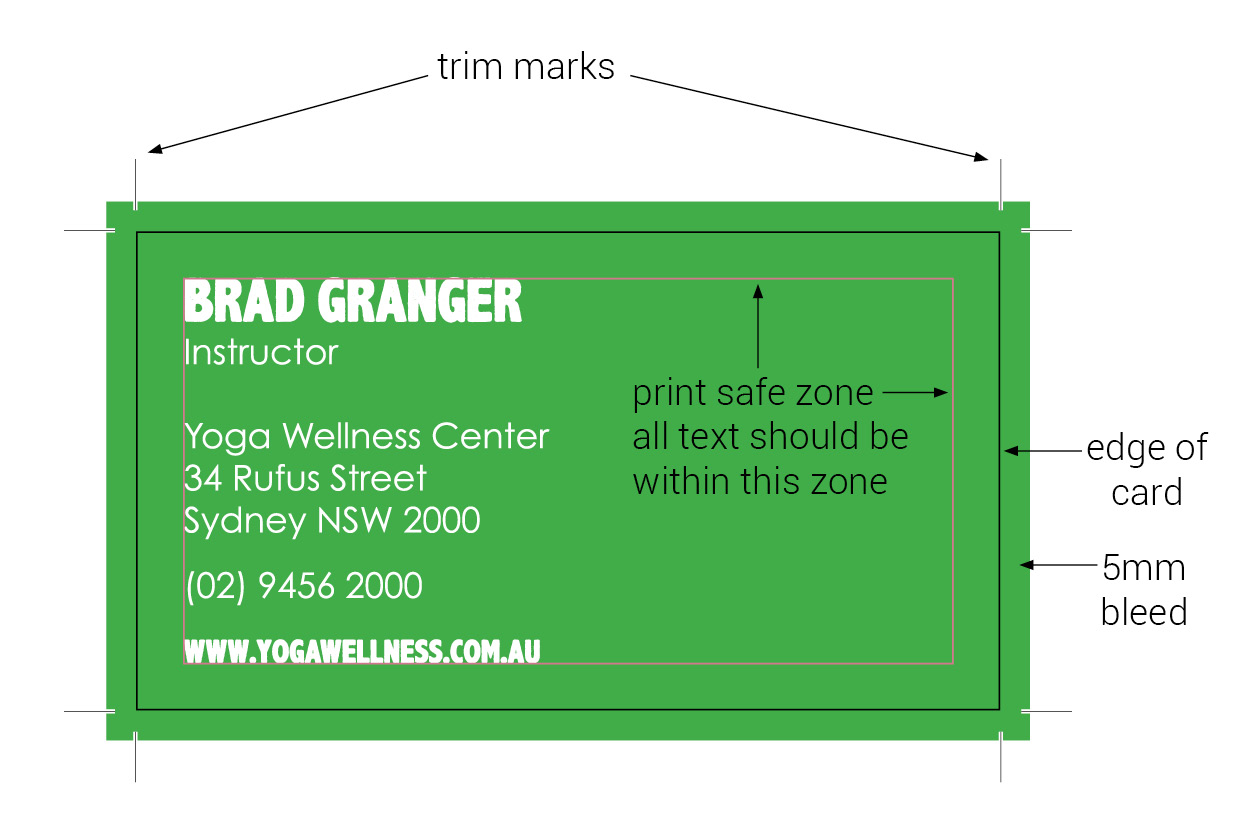 Essentially you want to make sure your file has ticked all the boxes of this checklist:
- Document size has been set up to the size the printed product needs to be
- Document colour has been set to CMYK (see my guide on how to do this)
- Document has 3mm or 5mm bleed. If you are printing large banners, the bleed should be at least 10mm
- Depending on the size of the document, a minimum of a 5mm margin has been allowed. No text is allowed outside of this margin as it may be cut off
- Text has been outlined (see my guide on how to do this)
- SPELL CHECK and PROOF READ your document! Majority of printers will not take responsibility for documents printed with spelling errors
CMYK vs RGB
Documents that are going to be printed need to be set up in CMYK colour mode. These are the colours a printer uses (cyan, magenta, yellow & black). If you set it up in RGB (screen colours, red, green & blue) colour mode, you will end up with a file that looks totally different to what you were looking at on screen. Check out this blog post to learn more about CMYK and RGB.