How I use Asana to plan content and stop faffing
Share this post so that you can refer back to it later!
What is faffing?
In this post, I talk about how I use Asana to plan content and avoid faffing. If you don’t know what faffing is, you’re not alone. I hadn’t even heard of the word until a few weeks ago when a friend asked me ‘have you joined the faffing group?’
So I decided to give it a quick Google, and here’s what I found:
Faffing is to aimlessly waste time doing useless tasks. A faffer is the enemy of time, effortlessly consuming it while pretending to be constructive. Faffers are fussy, indecisive individuals, prone to procrastination, dithering between tasks, are easily distracted and achieve very little. In-two-minds, they flop from one thing to another and start all over again.
I’d have to admit. I was slightly offended because somehow he knew that I was “faffing”.
This made me realise how easily distracted I was. I was falling “shiny object syndrome” because I failed to leverage the systems that I put in place to make sure that I stay on task.
Systems help us ensure that we remain focused, get tasks done according to priority, and actually get them done on time.
And the tools that I use to keep me on track are Asana and my Digital Business Planner.
The digital planner helps me organise my business and keeps me on top of all my tasks. I created it using Google Sheets so it’s super easy to use. Find out more about my digital planner here.
Now, let’s talk about how I use Asana.
What is Asana?
Asana is a simple project management tool that helps you keep up-to-date on tasks and projects. I use it along with my digital planner to list my to-do’s as well as plan my daily, weekly, and monthly tasks. Ever since I started using this system, my productivity has tripled. I get more things done, and no more half completed tasks.
So quick disclaimer.
My way of using Asana may not be for everyone. You may require less planning or more, depending on your level of complexity. Thankfully, Asana is a flexible tool and can be used for both small and big projects.
While I do like to be organised, I prefer to keep things minimal so I don’t get overloaded and I don’t get distracted by things that I don’t need to be doing.
How do I use Asana?
When you sign in to Asana, you’ll see the Home page.
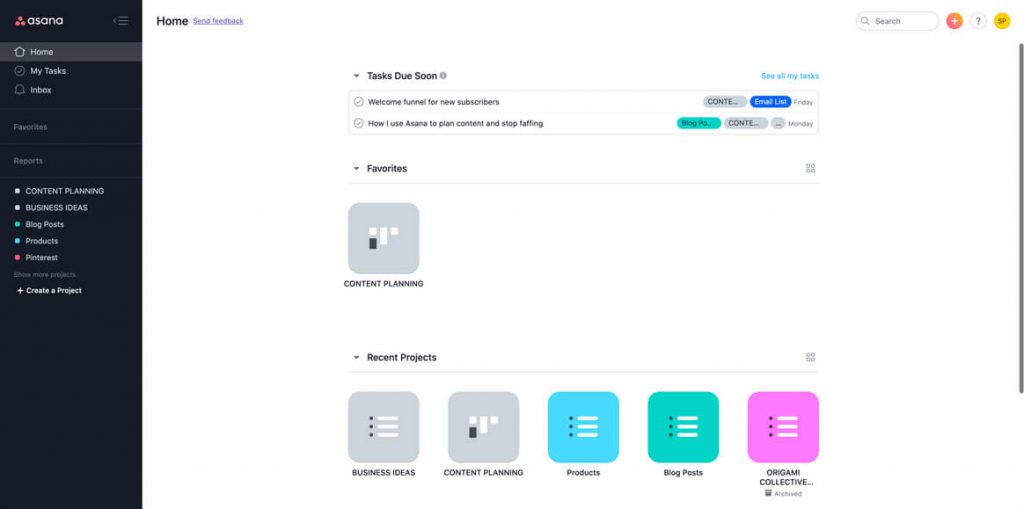
In here, you’ll see an overview of the tasks you have coming up or if you have any tasks that’s overdue, it’s also going to show up in that area. You’ll also see your favorite section projects there, as well as the other recent projects that you’re working on.
If you want to see your full list of tasks, simply go to ‘My Tasks’ which is found just below the Home button on your left sidebar.
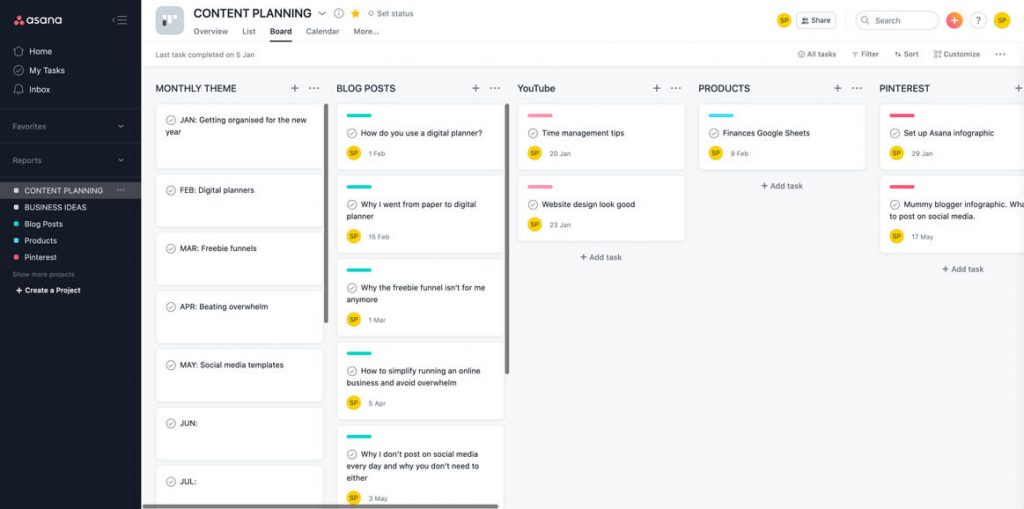
I’ve created a project called Content Planning which is where I…you guessed it, I plan out my content. This board is where all the magic happens. It’s where I plan out all of my content – from blog posts to YouTube videos.
Sticking to a monthly theme
The first section is my monthly themes.
Every month I pick a theme about what my content is going to be based around.
My theme for January is around getting organised for the New Year. So all of my content, including blog posts, YouTube videos, and Pinterest will be all about organisation. I find that it’s easier to be in the zone and come up with content ideas when it’s all around the same theme.
Using Asana to content plan
The next few sections outline all the content areas that I have in my business. Under each section, I’ve listed down the pieces of content that I need to create for that platform and I’ve set that up as a task in Asana.
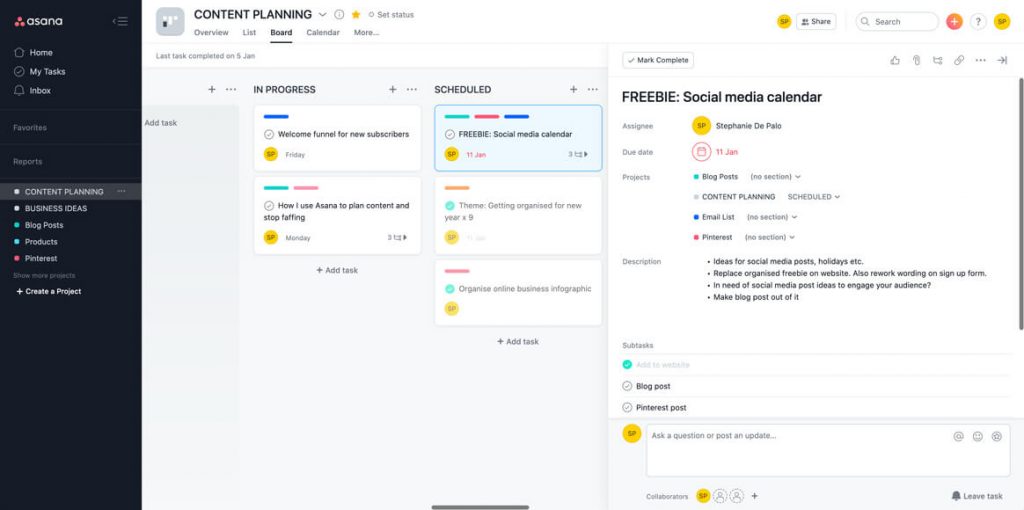
The last sections are all about the status of each task. So I have four boards there – planning, in progress, scheduled, and live. Once I’m ready to start working on a task, I just drag it to the relevant stage in my content creation process.
[thrive_leads id=’87585′]
Colour coordinating tasks
If you’ll notice, each task has different coloured bars. Each colour represents the platform that the specific content is going to be on. For example, you’ll notice above that aqua is for Blog Posts, Blue is for Email List, and Red is for Pinterest.
I set that up by creating Projects for each one. So you’ll see in the left side bar, you have ‘Blog Posts’, ‘Products’, and ‘Pinterest’ in the same colour as the ones you see in the task cards.
To set that up, I create a new project. I then assign a colour by clicking on the list icon next to the project title as shown below.

As you can see, I’ve listed all of my content ideas for this particular platform here and then I add them to the Content Planning board.
To do that, I open up each task then I go to Projects and if I hover over to the Project title, a little plus icon shows up (it’s not showing in the screenshot here but I’ve circled the area where it typically pops up).
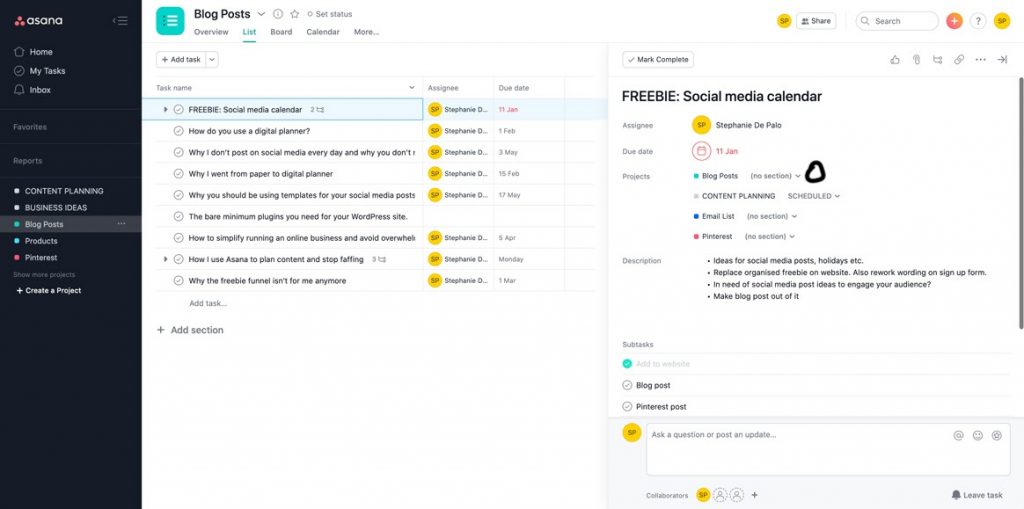
Once you’ve clicked on the + icon, a dropdown list will appear containing all of your Asana Projects. So I just selected Content Planning and that task will immediately appear in the Content Planning board. To add it to the Blog Posts section, I just clicked the dropdown arrow next to Content Planning and selected the appropriate section.
Why I colour coordinate tasks
Now I don’t really use these individual projects too much.
I only created them for the purpose of colour coding a task. For some reason, Asana doesn’t offer that option unless it’s a project so that’s why mine is setup this way.
What’s great about these colour coordinating bars is that you get to assign a task to multiple projects. So if, for example, I want to create a freebie and I want to promote it on the blog, on my email list, and on Pinterest, I will add the task to all these three projects.
In the Content Planning Project Board, that specific task will then have three coloured bars in there so I get a quick glance at the things that I need to do for this one task or content idea.
Related post: How to organise your online business to avoid overwhelm & maximise your time
I always assign the tasks to myself
Once the task is setup, I then make sure that I assign it to myself so that it shows up under the My Tasks section. I also make sure to assign deadlines to each task so I feel a sense of urgency. Otherwise, I’d just keep putting it off until the amount of work becomes too overwhelming and I’d eventually end up faffing.
By adding all these content ideas into Asana, it becomes actionable. It’s not just floating around my head and I don’t end up forgetting it.
How to avoid shiny object syndrome
Another project that I also want to show you is my ‘Business Ideas’ project.
THIS. WAS. A. GAMECHANGER. FOR. ME.
Because I’m the type of person who easily goes off track each time I see something cool, I usually end up with a bunch of half-finished stuff.
So now every time I find something that I want to do, I just list it under Business Ideas so I can go back to it when I have the time. That way, I’ll be able to remember them while still being focused on the tasks that I have already set for myself.
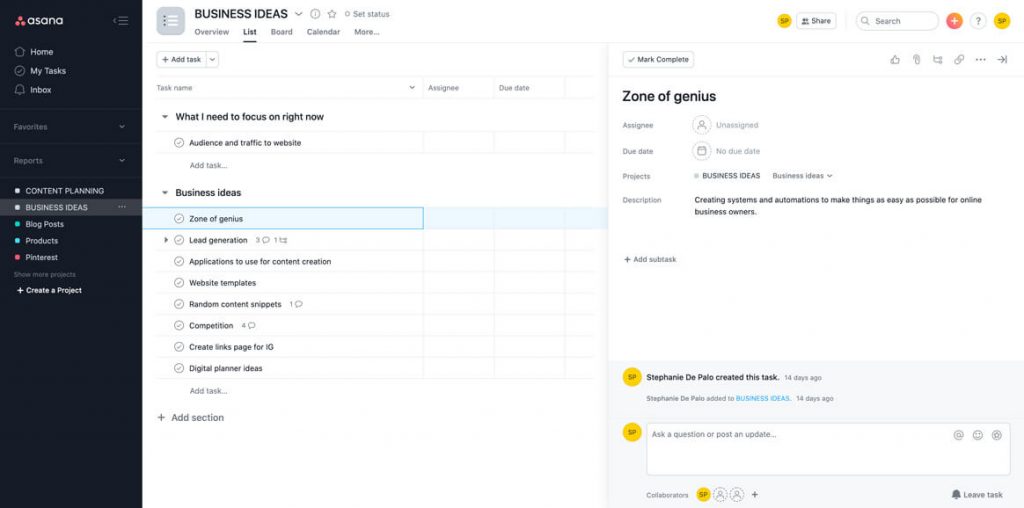
And that’s basically my entire system!
It’s super simple. Nothing complex. But it really does wonders for my personal productivity. It keeps me laser-focused on my goals, avoid any distractions, and actually get things done.
Have you used Asana before? Let us know in the comments section how it helps you organise your business!
Share this post so that you can refer back to it later!
