How I use a digital planner to beat my never ending to-do list
Believe it or not, I was not the super organised person I'm known for being now. I used to keep MENTAL to-do lists - shock, horror.
Flash forward a few years and now, I cannot live without my digital planner. I would forget to pick up my mum from the airport if I didn’t have it noted - sorry mum!
Keeping tabs on your day-to-day tasks is a good way to beat the stress that occurs when running an online business. So here is a run down of the ways I use my digital planner to organise. Not for just work, but life in general.
Those of you who have already bought the digital planner, this video will show you how to make the most of its features. And if you’re new to the digital organisation game, click on the link below or read on for a 101 guide.
Let’s get into it.
How I plan my month
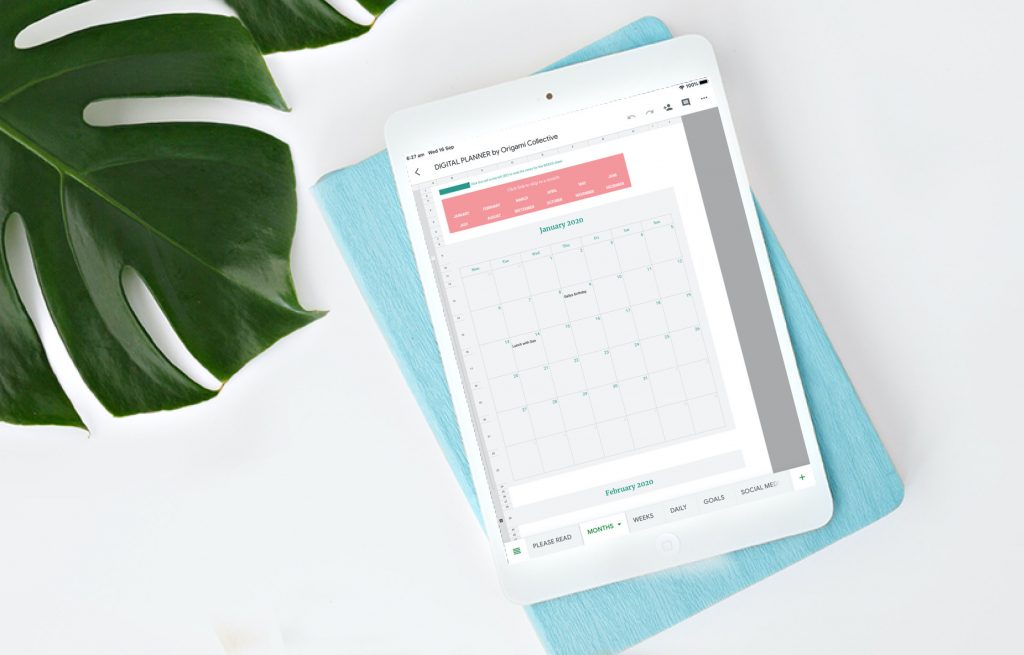
This is the MONTHS sheet, where you can get an overview of your whole year and look ahead for things to come. Here I would add tasks or up and coming appointments, which are further away than the current week I’m in.
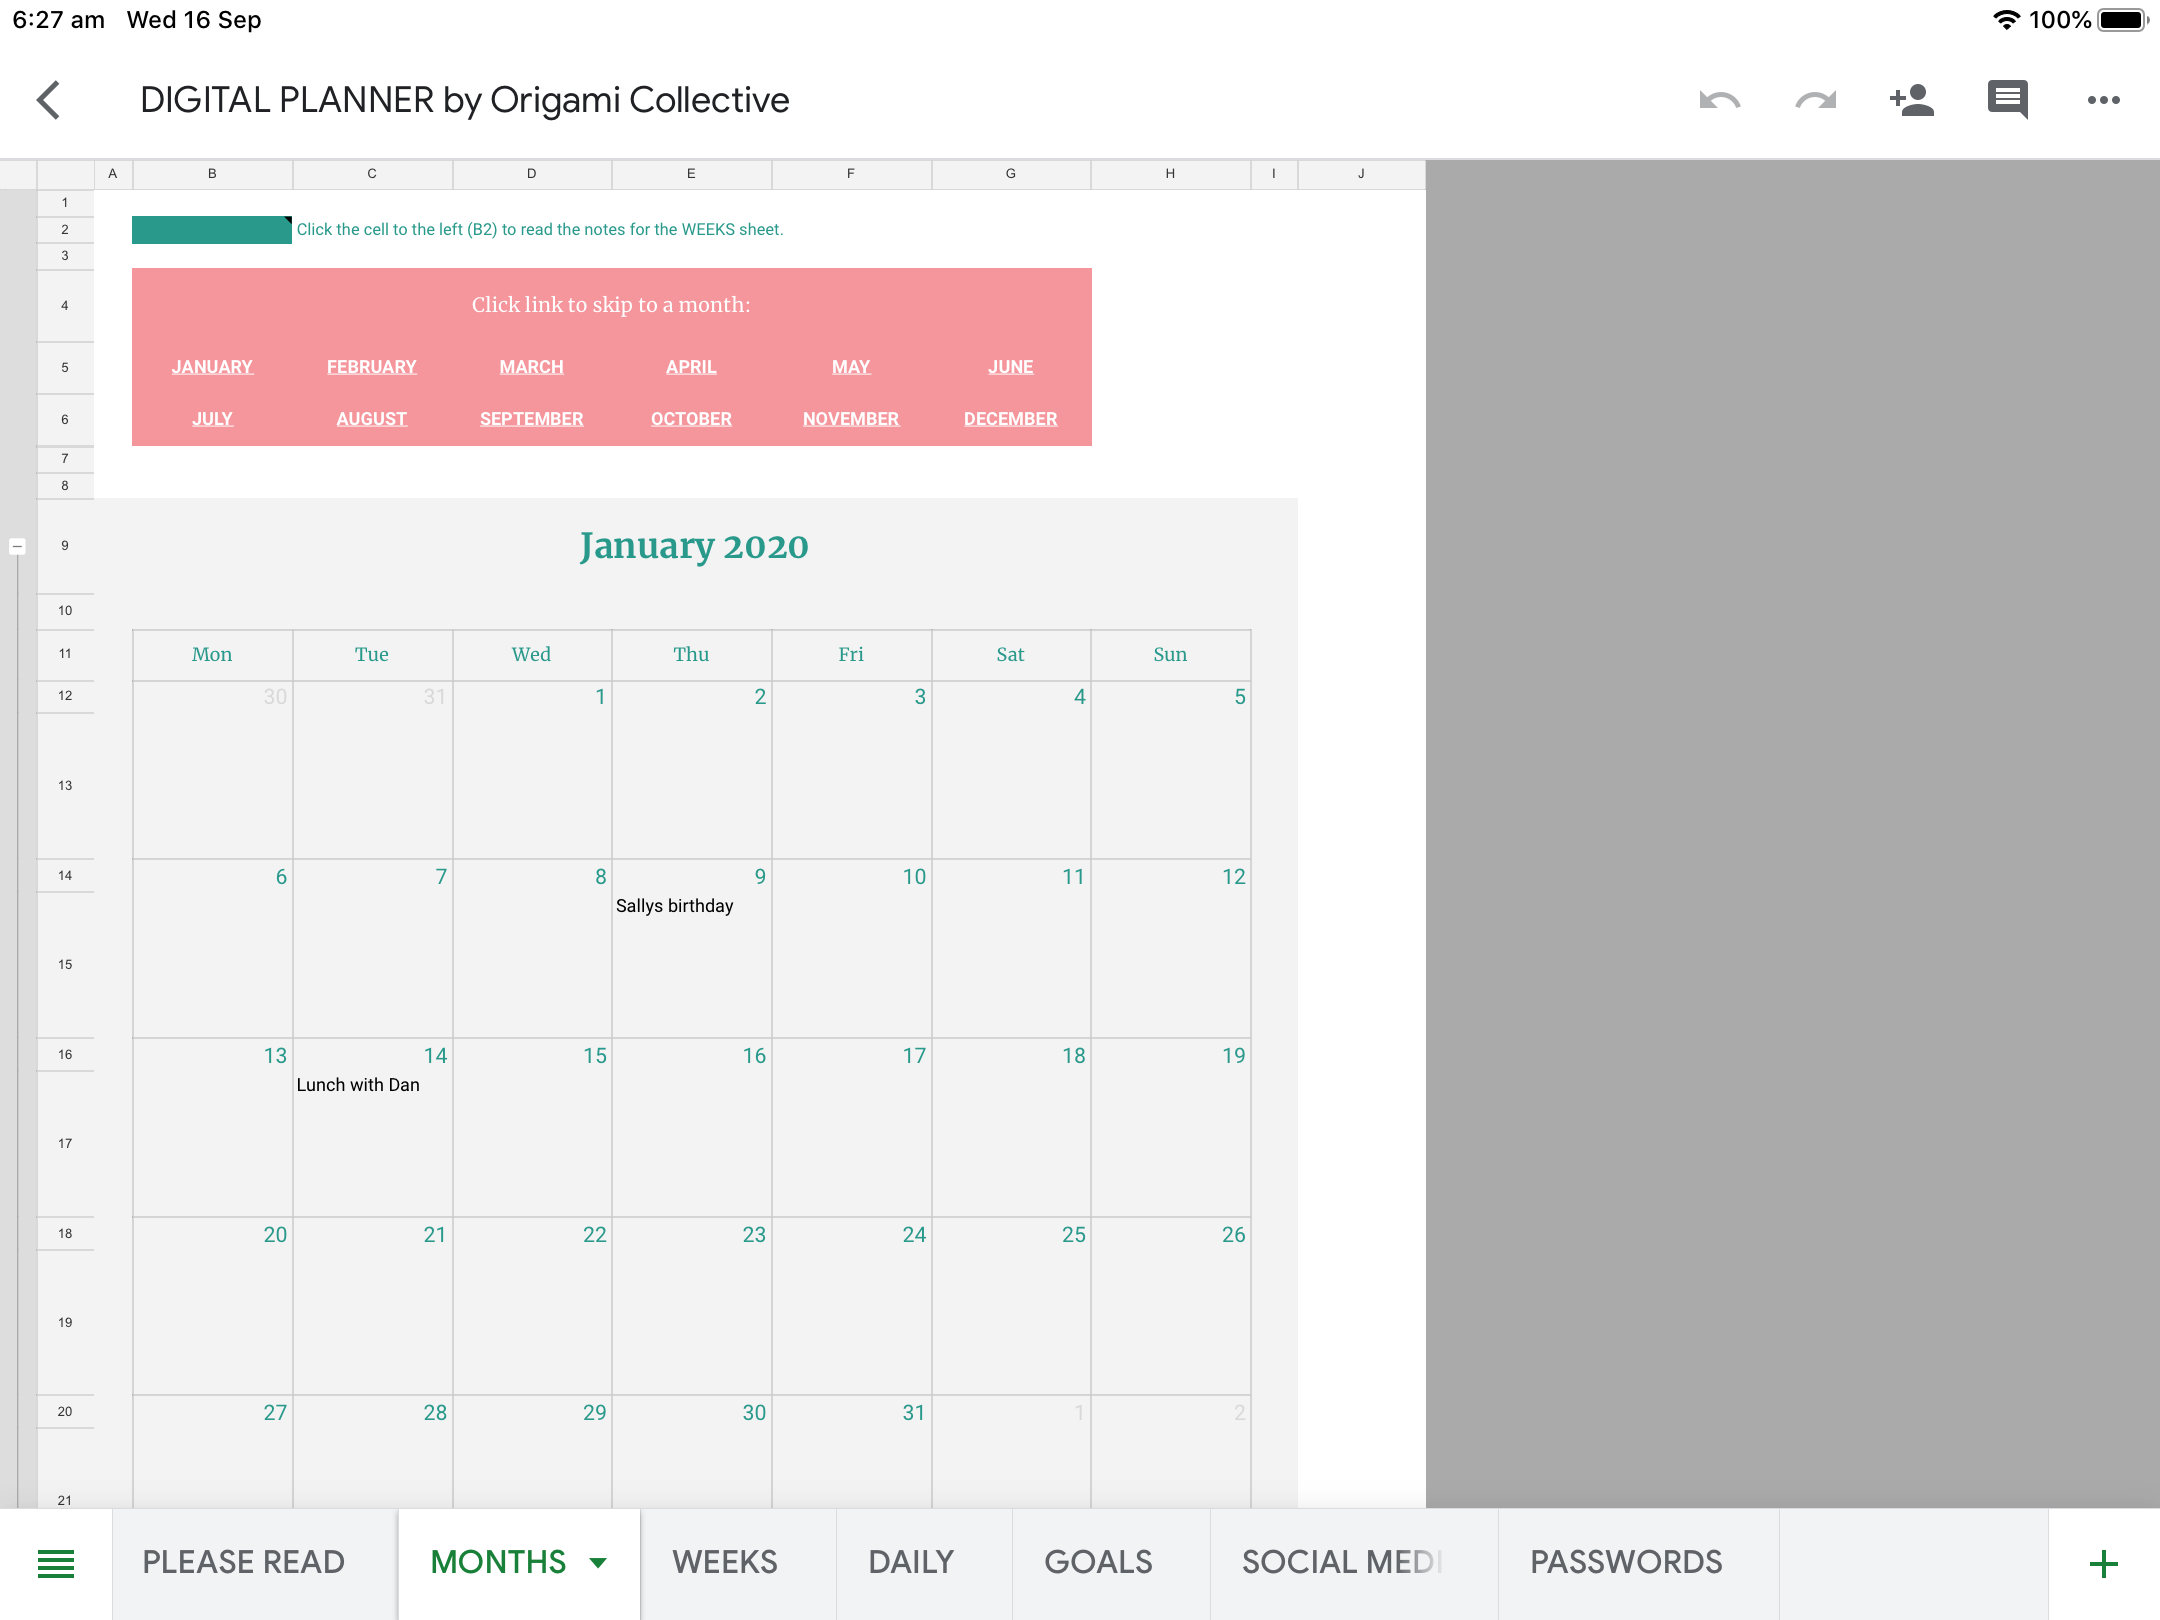
The rows that represent months are grouped, so you can hide them if you find that your monthly schedule is inactive.
It is designed so that if you change the year in January, the dates will auto update for the remaining months. If you’re on your computer you can click on the links here, and skip to any month you like.
Down the bottom is the ‘new year’ button, which will clear all your entries, but leave the dates. I like to do this big clear between Christmas and New Years day when I don’t usually have much going on.
Getting ready for the week
The WEEKS sheet is my preferred method for managing time. Every Sunday night I’ll take a look at my months sheet, and copy all my tasks over for that week.

I use my weekly time tracker, to block out where I am going to focus my time for that particular week. This has kept me the most productive, because I am able to get an understanding of where to prioritise my time.
Always make sure to add in time for exercise, relaxation and leisure. I usually block out at least three hours for my most important task. In this ‘do not disturb’ period I don’t check any messages, emails or anything that could distract me.
I’m completely focused during this time and this is when I get my best work done. The weekly time tracker sets out my schedule for the day, which comes next.
Planning my daily grind
My DAILY sheet is where I add my tasks for the day. Every morning, or sometimes even the night before, I’ll check my weekly sheet and add in any tasks or appointments listed.
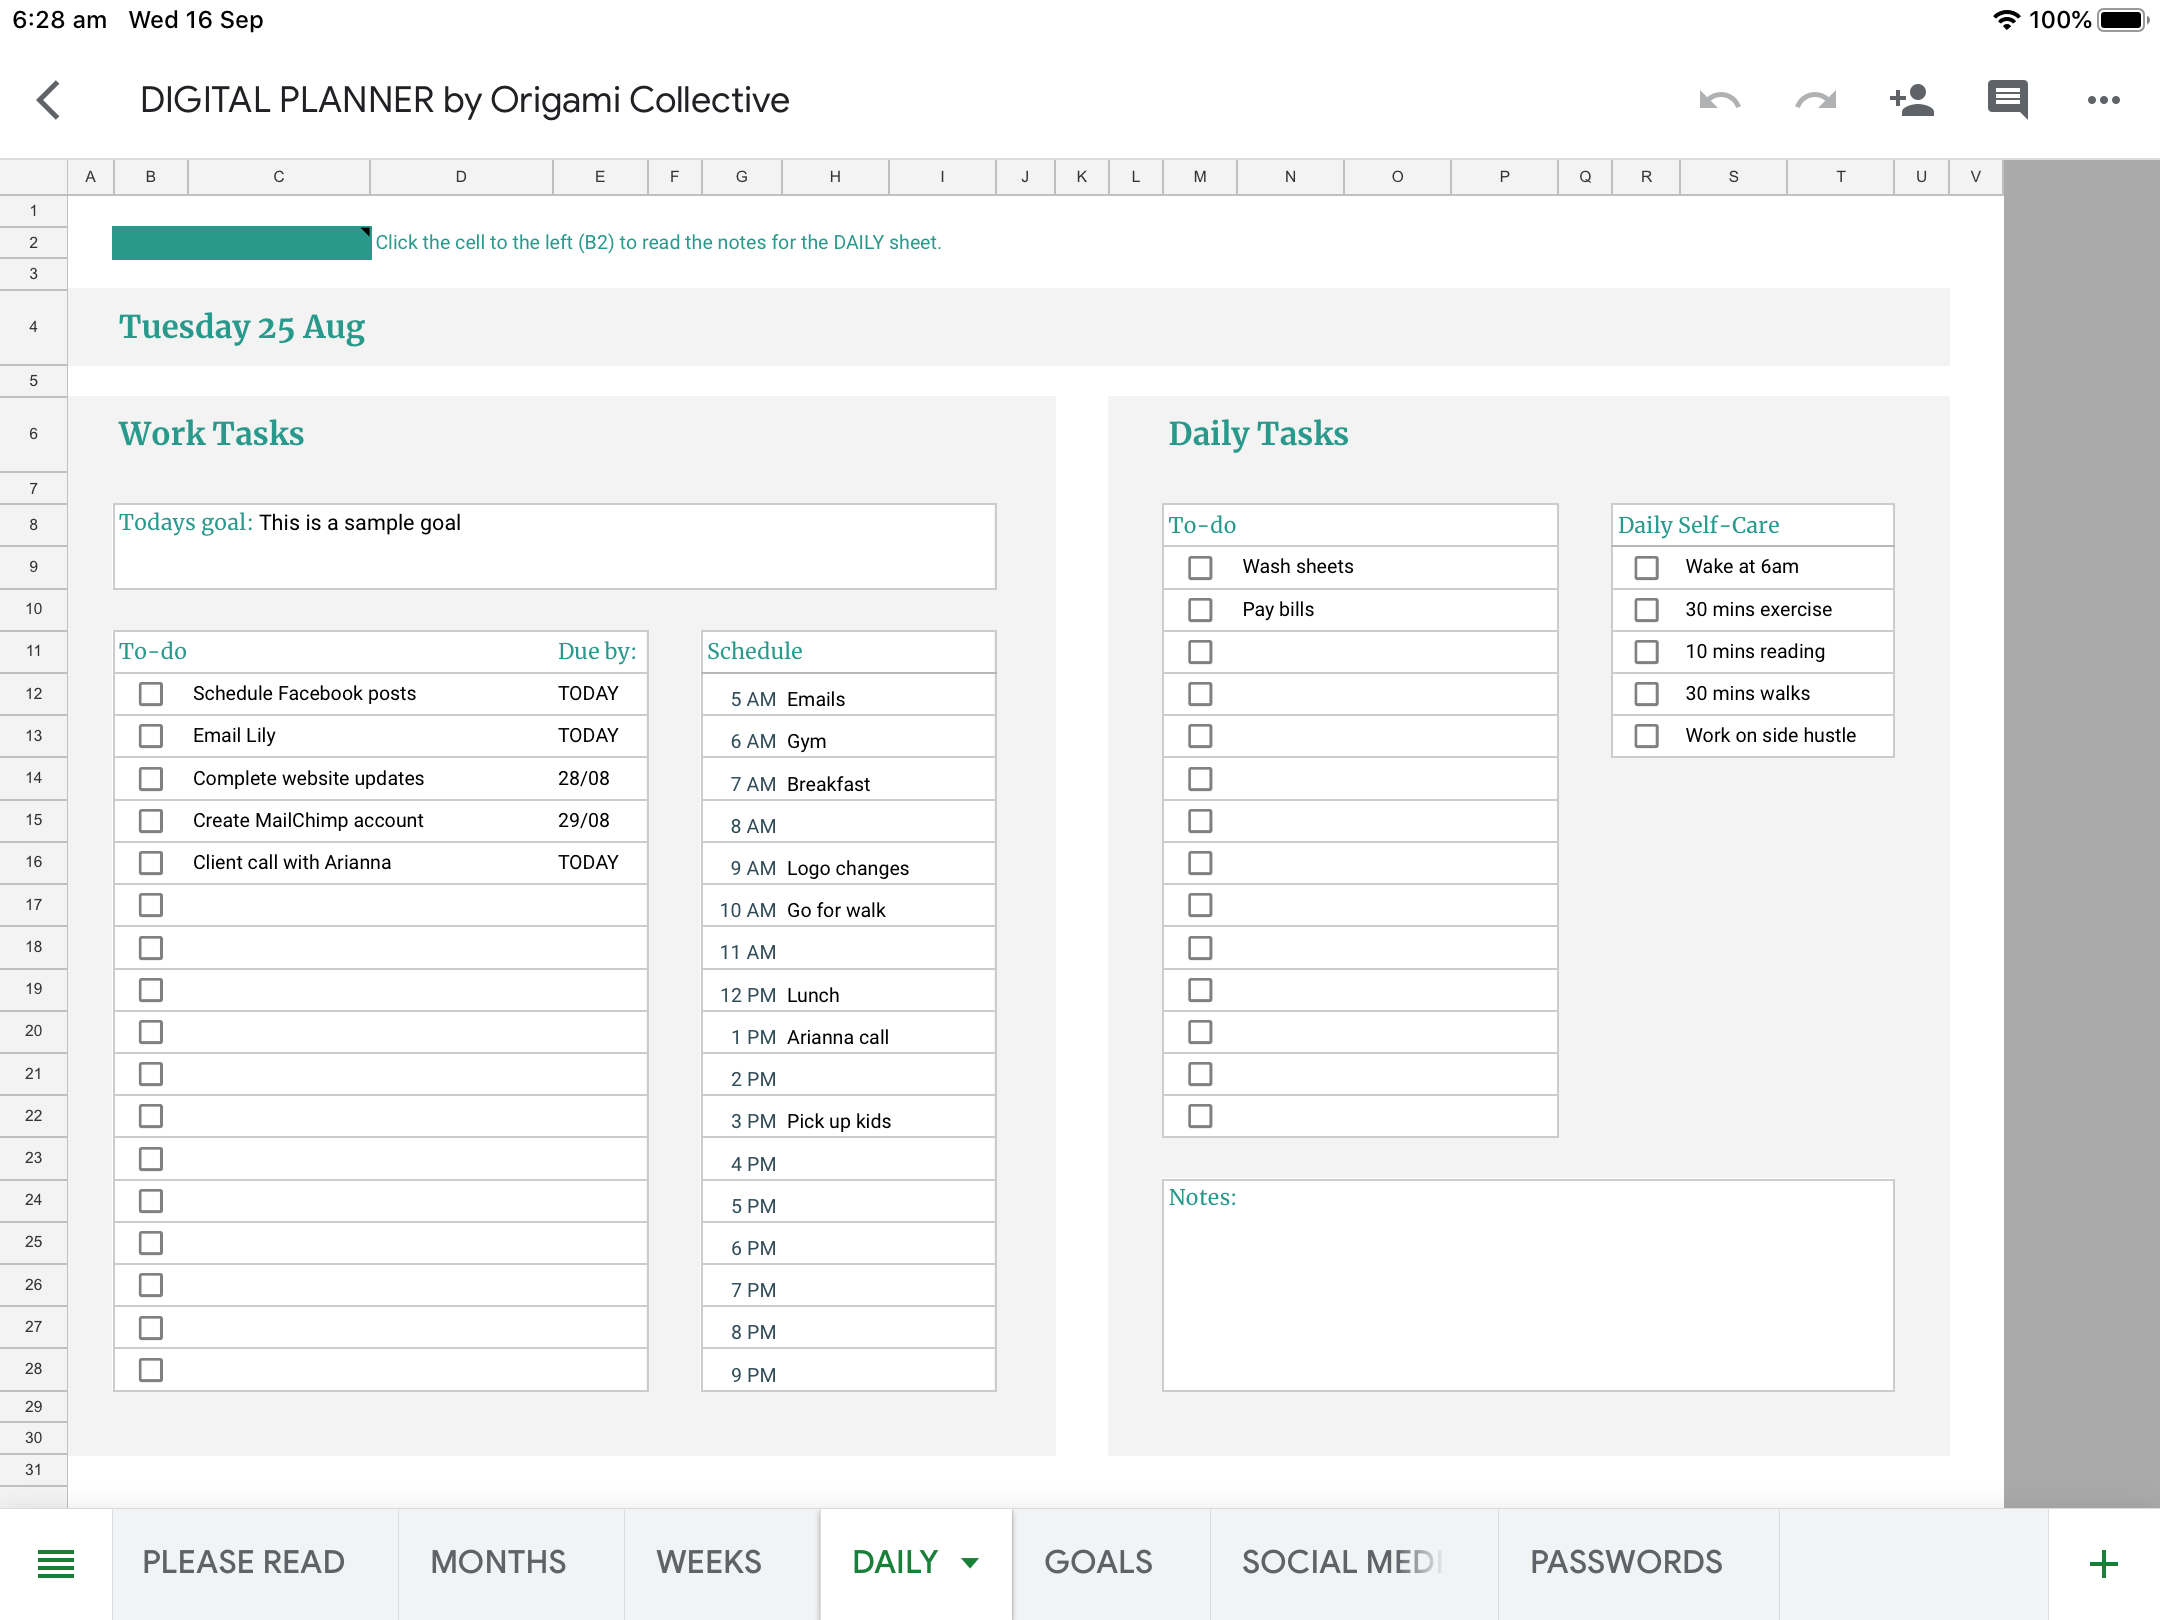
I refer to my weekly time blocker to check where I have blocked my time, and set my schedule for the day. In this example you’ll notice that for Monday I have blocked out 10- 12 pm, this is my working time.
In this example, I’ve put down that I’ll be doing website updates. At 1pm I’ve blocked out ‘catch up’ time, which is where I’ll check emails and messages.
This schedule is what keeps me on track, and I get so much done in a short amount of time. When you Designate part of your day to work, you stop getting distracted by other things, and stop feeling overwhelmed.
Schedule any new tasks that come up in accordance to when they're due.
Related post: How I use Asana to plan content and stop faffing
I create a separate to do list for non-work related tasks, as we all know how long that list can get! This ensures that you don't confuse your work tasks with things such as your house work or visa-versa.
If you’re anything like me, I start to feel overwhelmed and anxious when I sit at my desk all day. Daily self-care is what keeps me stress free during the day. So I set self care tasks that I know help me when I feel like I'm under pressure.
This is important and is something we easily forget to do. If you are feeling stressed or anxious – you won’t do your best work. When you don't make time for yourself motivation will be lost and things will take longer than they need to.
Self-care is important! Make sure you make time for you!
Setting goals for success
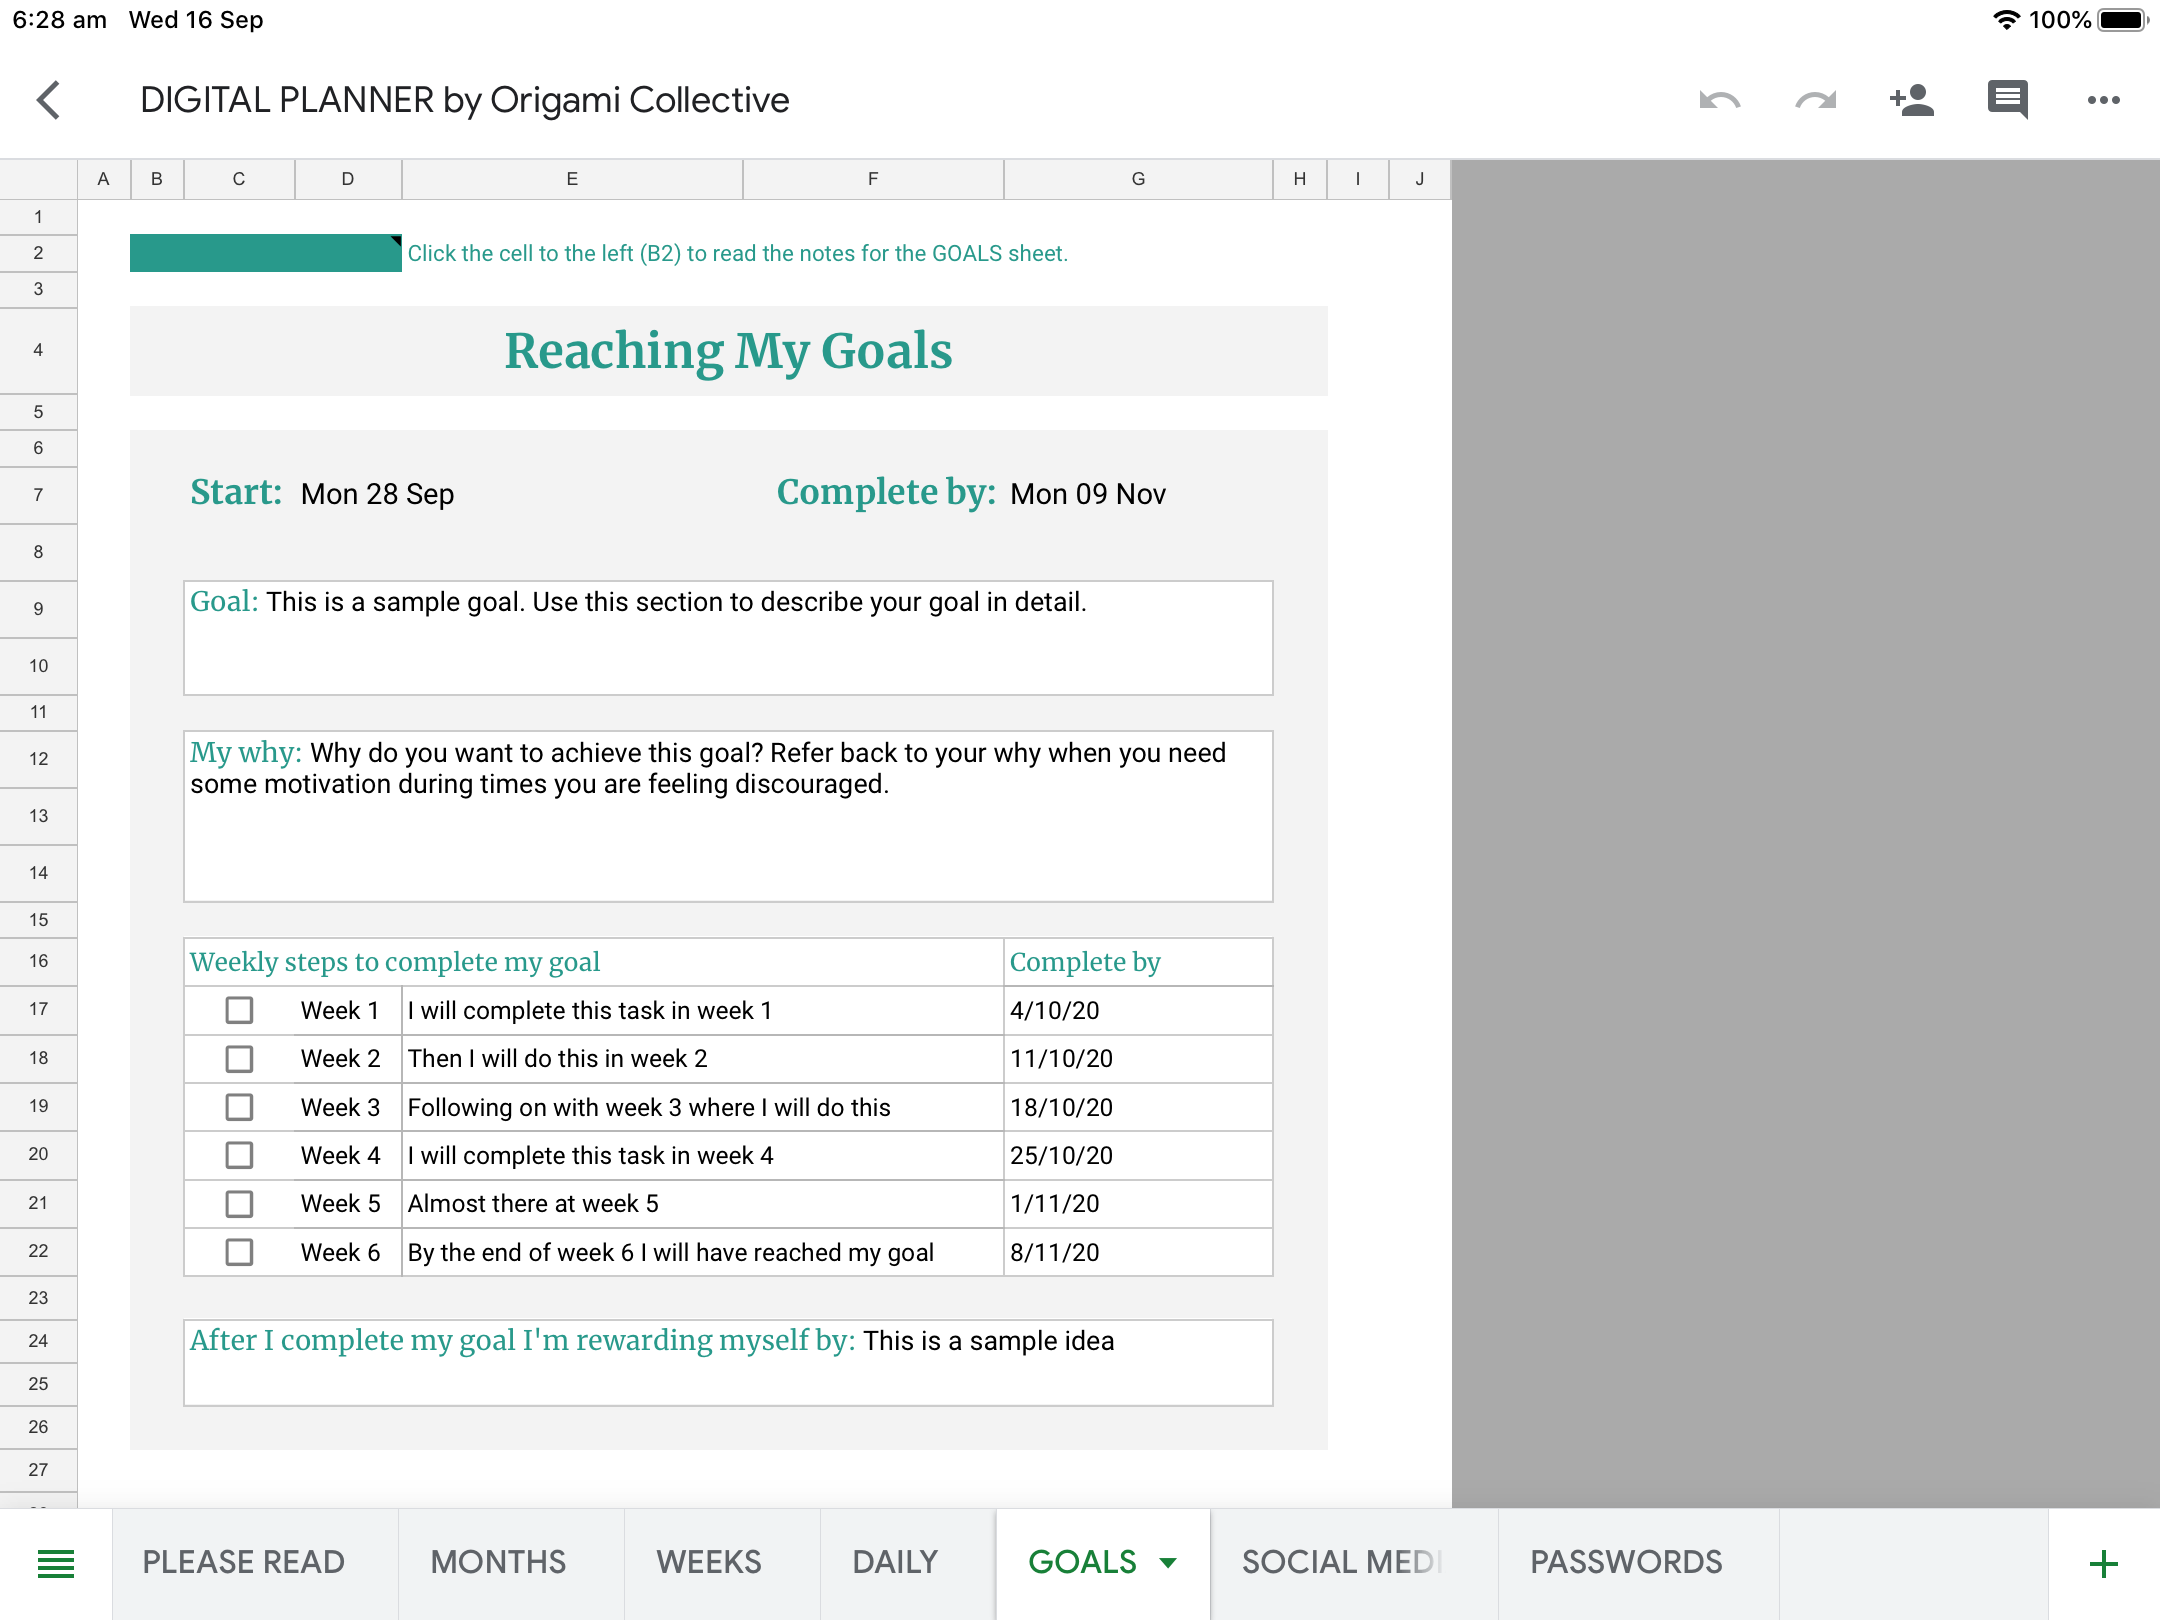
I never used to feel the need to set goals, so the GOALS sheet has been a game changer for me.
After floating around aimlessly, with no progress made in my business, I realised I was never going to get anywhere without setting some goals. Now I write them down and keep myself accountable for my progress.
The 12 Week Year by Brain Moran, helped me come up with my own goal reaching system. Based off of his 12-week goal plan.
[thrive_leads id='87585']
I only set goals that can be realistically achieved within 6 weeks (12 weeks was too long for my impatient brain). In this 6-week period, I only focus on 2-3 goals, or else it gets to be too much.
The goal section has been set up so that you focus on one specific task per week. You may not need the whole six weeks, but make sure that you’re only focusing on one task per week, or you’ll burn yourself out.
You may have goals that don’t fit into the 6-week time frame, but you can still set a start and end date for reaching your goal. Then break it down into smaller, manageable tasks.
Add these tasks onto the goals section of the weekly sheet, so that you can always remind yourself what you’re working towards for that week.
How I plan my social media schedule
Social Media content is important, especially when running an online business. This is the SOCIAL MEDIA scheduler, where I map out all my social media posts, usually for the next month.
Here I’ll put down my week start date, then use this sheet to brainstorm what I’m going to post about. Once I’ve created the posts, I’ll copy and paste the captions and hashtags into Facebook Business Suite, which is what I use to schedule my Instagram and Facebook posts.

I plan out my posts on this sheet, because I can come up with captions without getting distracted by anything else on the screen.
Social Media content is important, especially when running an online business. This is the SOCIAL MEDIA scheduler, where I map out all my social media posts, usually for the next month.
Related post: Social media post ideas: Free download
Here I’ll put down my week start date, then use this sheet to brainstorm what I’m going to post about. Once I’ve created the posts, I’ll copy and paste the captions and hashtags into Facebook Business Suite, which is what I use to schedule my Instagram and Facebook posts.
Coming up with captions and content is easy when you are not distracted by anything else on the screen.
I spend more time scrolling through my planner than I do social media. I enjoy seeing all my tasks neatly set out and it’s calming knowing that I’ve got everything written down – it’s not just floating around inside my head anymore.
If you haven't started your digital planning journey yet, check out the Digital Business Planner here. And if you have started using a digital planner get on it. You’ll thank me.
Happy planning!
How I use Asana to plan content and stop faffing
What is faffing?
In this post, I talk about how I use Asana to plan content and avoid faffing. If you don’t know what faffing is, you're not alone. I hadn't even heard of the word until a few weeks ago when a friend asked me ‘have you joined the faffing group?’
So I decided to give it a quick Google, and here's what I found:
Faffing is to aimlessly waste time doing useless tasks. A faffer is the enemy of time, effortlessly consuming it while pretending to be constructive. Faffers are fussy, indecisive individuals, prone to procrastination, dithering between tasks, are easily distracted and achieve very little. In-two-minds, they flop from one thing to another and start all over again.
I’d have to admit. I was slightly offended because somehow he knew that I was “faffing”.
This made me realise how easily distracted I was. I was falling “shiny object syndrome” because I failed to leverage the systems that I put in place to make sure that I stay on task.
Systems help us ensure that we remain focused, get tasks done according to priority, and actually get them done on time.
And the tools that I use to keep me on track are Asana and my Digital Business Planner.
The digital planner helps me organise my business and keeps me on top of all my tasks. I created it using Google Sheets so it’s super easy to use. Find out more about my digital planner here.
Now, let’s talk about how I use Asana.
What is Asana?
Asana is a simple project management tool that helps you keep up-to-date on tasks and projects. I use it along with my digital planner to list my to-do’s as well as plan my daily, weekly, and monthly tasks. Ever since I started using this system, my productivity has tripled. I get more things done, and no more half completed tasks.
So quick disclaimer.
My way of using Asana may not be for everyone. You may require less planning or more, depending on your level of complexity. Thankfully, Asana is a flexible tool and can be used for both small and big projects.
While I do like to be organised, I prefer to keep things minimal so I don’t get overloaded and I don’t get distracted by things that I don’t need to be doing.
How do I use Asana?
When you sign in to Asana, you’ll see the Home page.

In here, you’ll see an overview of the tasks you have coming up or if you have any tasks that’s overdue, it’s also going to show up in that area. You’ll also see your favorite section projects there, as well as the other recent projects that you’re working on.
If you want to see your full list of tasks, simply go to ‘My Tasks’ which is found just below the Home button on your left sidebar.
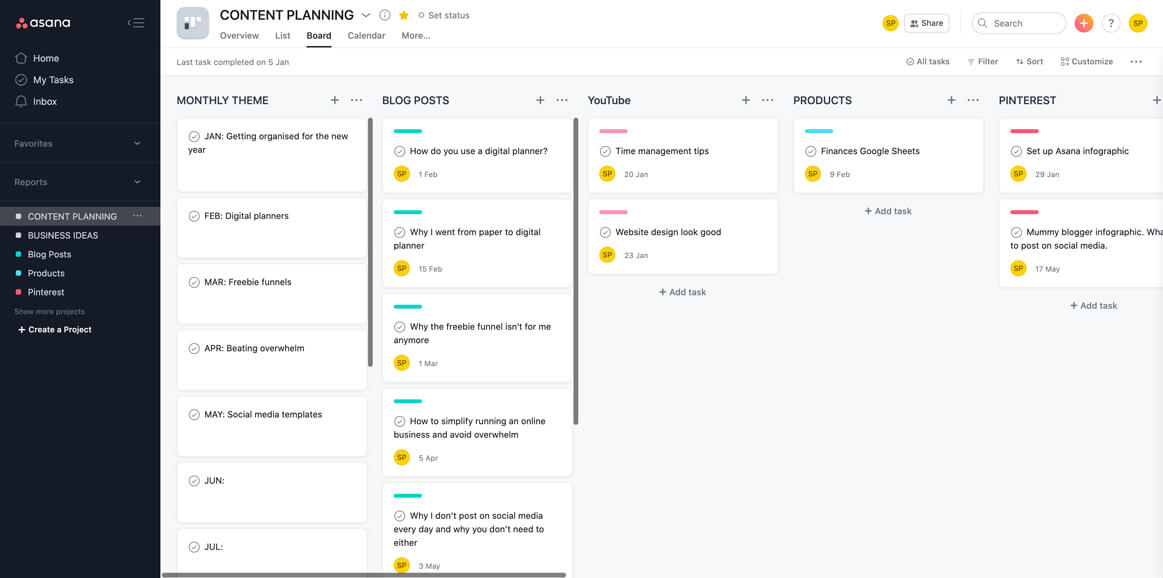
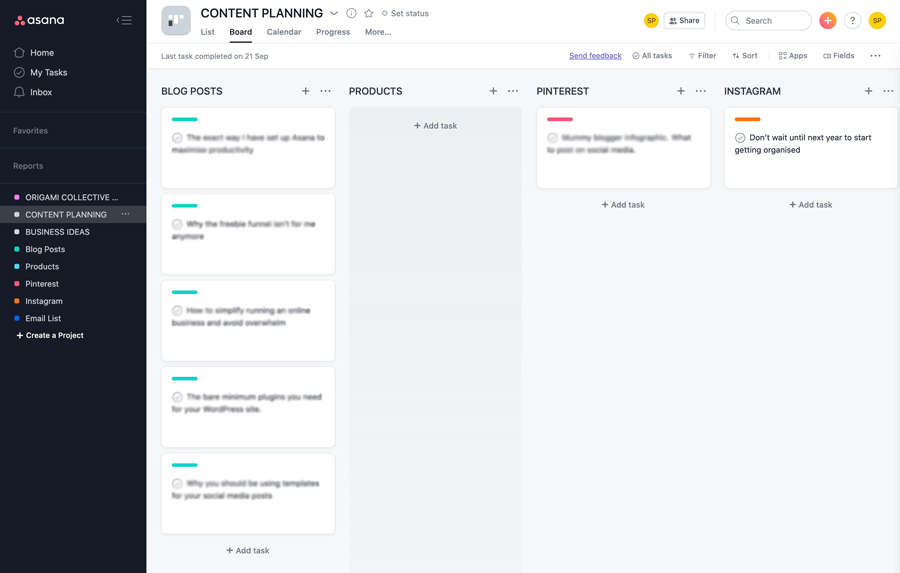
I've created a project called Content Planning which is where I...you guessed it, I plan out my content. This board is where all the magic happens. It’s where I plan out all of my content - from blog posts to YouTube videos.
Sticking to a monthly theme
The first section is my monthly themes.
Every month I pick a theme about what my content is going to be based around.
My theme for January is around getting organised for the New Year. So all of my content, including blog posts, YouTube videos, and Pinterest will be all about organisation. I find that it’s easier to be in the zone and come up with content ideas when it’s all around the same theme.
Using Asana to content plan
The next few sections outline all the content areas that I have in my business. Under each section, I’ve listed down the pieces of content that I need to create for that platform and I’ve set that up as a task in Asana.
The last sections are all about the status of each task. So I have four boards there – planning, in progress, scheduled, and live. Once I’m ready to start working on a task, I just drag it to the relevant stage in my content creation process.
[thrive_leads id='87585']
Colour coordinating tasks
If you’ll notice, each task has different coloured bars. Each colour represents the platform that the specific content is going to be on. For example, you’ll notice above that aqua is for Blog Posts, Blue is for Email List, and Red is for Pinterest.
I set that up by creating Projects for each one. So you’ll see in the left side bar, you have ‘Blog Posts’, ‘Products’, and ‘Pinterest’ in the same colour as the ones you see in the task cards.
To set that up, I create a new project. I then assign a colour by clicking on the list icon next to the project title as shown below.

As you can see, I’ve listed all of my content ideas for this particular platform here and then I add them to the Content Planning board.
To do that, I open up each task then I go to Projects and if I hover over to the Project title, a little plus icon shows up (it’s not showing in the screenshot here but I’ve circled the area where it typically pops up).
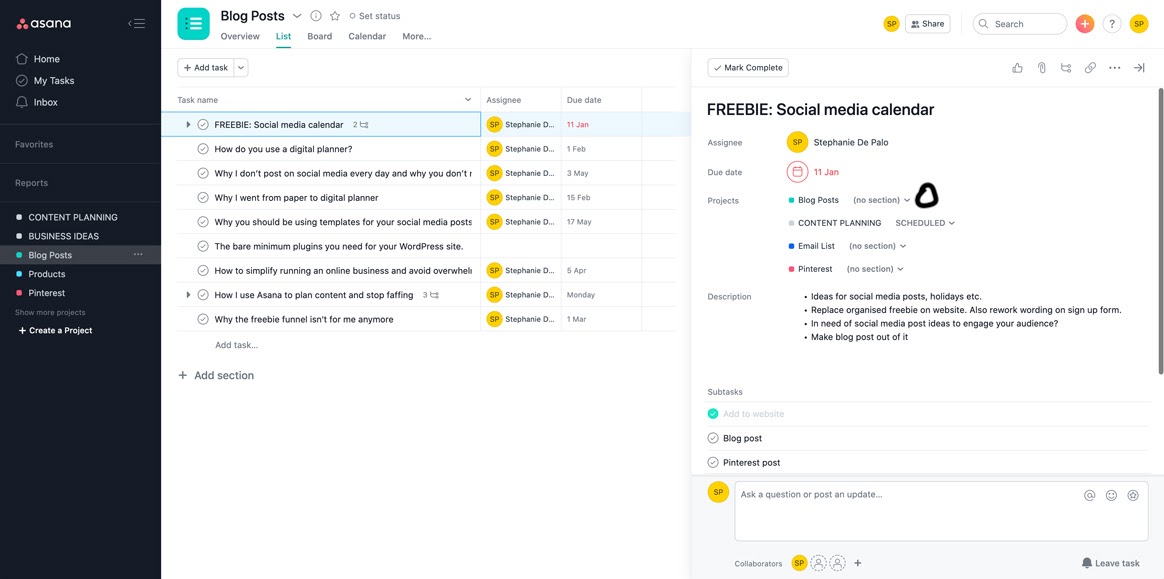
Once you’ve clicked on the + icon, a dropdown list will appear containing all of your Asana Projects. So I just selected Content Planning and that task will immediately appear in the Content Planning board. To add it to the Blog Posts section, I just clicked the dropdown arrow next to Content Planning and selected the appropriate section.
Why I colour coordinate tasks
Now I don’t really use these individual projects too much.
I only created them for the purpose of colour coding a task. For some reason, Asana doesn’t offer that option unless it’s a project so that’s why mine is setup this way.
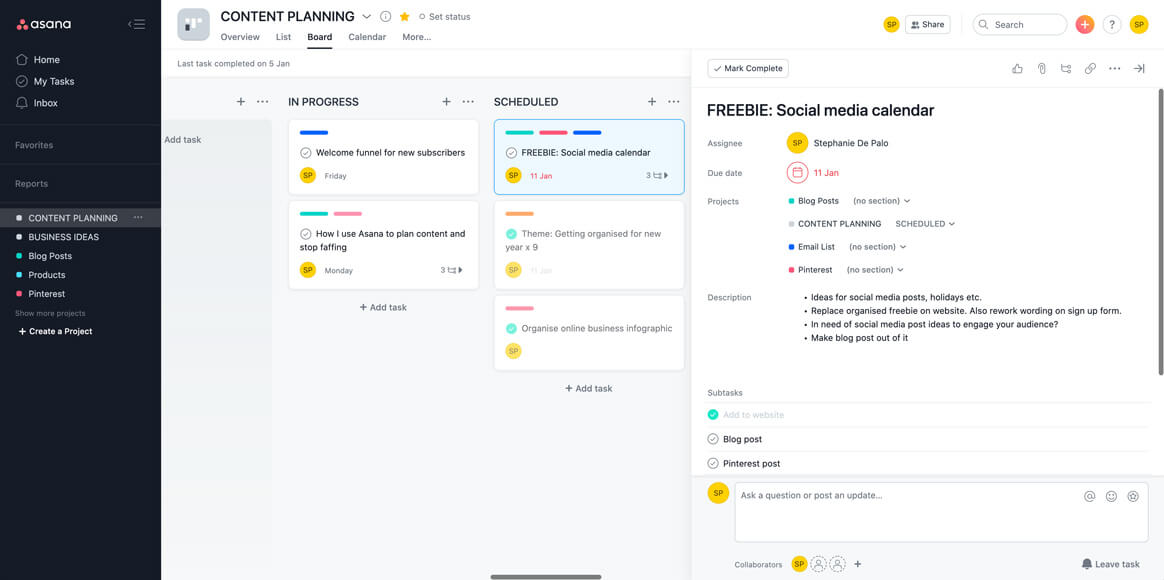
What’s great about these colour coordinating bars is that you get to assign a task to multiple projects. So if, for example, I want to create a freebie and I want to promote it on the blog, on my email list, and on Pinterest, I will add the task to all these three projects.
In the Content Planning Project Board, that specific task will then have three coloured bars in there so I get a quick glance at the things that I need to do for this one task or content idea.
Related post: How to organise your online business to avoid overwhelm & maximise your time
I always assign the tasks to myself
Once the task is setup, I then make sure that I assign it to myself so that it shows up under the My Tasks section. I also make sure to assign deadlines to each task so I feel a sense of urgency. Otherwise, I’d just keep putting it off until the amount of work becomes too overwhelming and I’d eventually end up faffing.
By adding all these content ideas into Asana, it becomes actionable. It’s not just floating around my head and I don’t end up forgetting it.
How to avoid shiny object syndrome
Another project that I also want to show you is my ‘Business Ideas’ project.
THIS. WAS. A. GAMECHANGER. FOR. ME.
Because I’m the type of person who easily goes off track each time I see something cool, I usually end up with a bunch of half-finished stuff.
So now every time I find something that I want to do, I just list it under Business Ideas so I can go back to it when I have the time. That way, I’ll be able to remember them while still being focused on the tasks that I have already set for myself.

And that’s basically my entire system!
It’s super simple. Nothing complex. But it really does wonders for my personal productivity. It keeps me laser-focused on my goals, avoid any distractions, and actually get things done.
Have you used Asana before? Let us know in the comments section how it helps you organise your business!

Social media post ideas: Free download
I've put together a spreadsheet of fun, silly, and serious 'days' from around the world that you can use as inspiration for your daily social media posts. You can use them as inspiration to create image posts on Instagram and Facebook, written posts on Facebook and even great engagement posts in your Facebook group.
Do you like this free download and want more? Join my updates list and get instant access to all past, present and future free resources I create.
[thrive_leads id='87757']
How to organise your online business to avoid overwhelm & maximise your time
You’ve probably seen blog articles such as ‘17 apps that you NEED to run your online business’, or ‘100 ways to organise your online business’. And if you’re anything like me, seeing those big numbers instantly makes you feel overwhelmed.
Well I’m not here to add more to your plate. I'm here to share the 5 applications/platforms that I use to organise my online business. Yep, just 5! I’m all about keeping things simple and organised so that I don’t overload myself.
What I love about the below apps, is that they can be accessed on mobile and desktop, so I am never caught off guard. As an online business owner, I’m not always at my desk and do find myself working on the go. So being mobile is really important when it comes to staying organised.
Some of the apps I use are not free, but I’m a firm believer that time = money. And anything that frees up my time for more important things, is well worth the money.
So, here’s how I organise my online business:
1. Google Drive
This is probably my most used application! Because it can be accessed from any device, I'm able to have my work files on hand wherever I am (including on the couch bingeing Netflix).
Within Google Drive, I use Google Sheets (like Microsoft Excel) and Google Docs (like Microsoft Word) for the day to day running of my online business. Here’s a few ways I use them that have helped me become so much more productive and organised:
1.1 Writing content such as blog posts and website copy
Right now I’m writing this blog post straight onto a Google Docs document. Once I’m finished I will then transfer my blog post onto my website. When I’m coming up with content for my website pages, I will add it onto my ‘Website Content’ Google Doc, and then add it to my website when I’m happy with it.
Why not just write it straight into WordPress? Well, several reasons:
- I can access Google Docs on my computer, phone, iPad, ALL the devices! Which means that while I may start writing my blog post on my computer, I could finish writing it from my phone while I’m waiting in the car for my kids to finish school.
- I’m not distracted by my website (anyone forever fiddling with their website design?) I can type without being influenced by my website design, which means I don’t add or leave out content just to fit in with the design. I design around my content (here’s a great article on how to DIY your own website copy).
- Google Docs automatically saves my work while I’m typing so I know I’ll never run into an issue with my website glitching and I lose everything.
1.2 Organise my online business and personal life
Did you know that you could use Google Sheets like a planner? A free digital planner? Yes please!
Don’t get me wrong, I have always been a paper planner lady. But being an online business owner (who works from home), I’m not always working at my desk, which is where I keep my planner. And I was finding that sometimes I would check an email on my phone, and would forget to write down the new task in my planner because I wasn’t sitting in front of it right then and there.
Being a mum of 3 who runs a household and an online business, I always have something on my mind that needs to be done. So if something isn’t written down it’s getting lost in the abyss of “I’ll remember that for later”.
Not to mention when planning appointments or catch ups on the go, I was always telling people “I’ll have to check my planner when I get home and I’ll let you know.” Spoiler: I didn’t let them know.
I never thought I would say it, but a paper planner just wasn’t working for me anymore.
So after a bit (a lot) of trial and error, I created a Digital Planner using Google Sheets. That I can bring with me wherever I go! No more forgetting tasks or appointments, and no more getting burned out because I’m trying to remember a million things at once.
Here’s an article on how you can create your own to-do list using Google Sheets.
Or, I’ve done all the hard work for you and created a full blown Digital Business Planner which you can find here. It’s got all the bells and whistles so you won’t think twice about betraying your paper planner.
1.3 Backing up my website and my computer
I used to keep all of my files and backups on an external hard drive. But said hard drive is now inaccessible and my files are probably lost forever. Who still uses an external hard drive to store their files?!
I now use Google Drive to backup all my important business stuff in two ways:
- I use a plugin called UpdraftPlus to back up my website to Google Drive automatically twice a day.
- I manually drop all my work files into Google Drive every so often. Because I keep all my freelance and website stuff in one place all I need to do is drop my Jobs folder from my computer into Google Drive and all the sub folders will auto update with the new files.
I do pay for extra Google Drive storage but it’s totally worth it to know that my files are safe and I’ll never be burned again by a broken hard drive.
Google Drive has also added a new ‘Privacy Screen’ feature for iPhone and iPad if you’re using the Google Drive app. You can read more info about how to use Privacy Screen here.
Using UpDraft for website backups, and manually dropping in folders for computer backup. Have paid for extra storage for Google Drive.
1.4 Sharing files with clients
As a designer, the files I usually need to share with clients are huge. So rather than trying to email them a 20gb file, I’ll create a folder for their project on my Google Drive and the share the link to the folder with them.
And then if they have images or content that they want to share with me, they can drop it straight into the Google Drive folder I created and everyone has access to all the project files.
2. Asana
If you offer 1:1 services, Asana is the perfect way to track your clients. And it’s free! (There is a pro version however I’ve managed to get by just using the free version).
But Asana can be used for so much more than tracking clients. I love using it to organise my online business side of things too.
Because Asana is so versatile, it can replace other 1 or 2 apps that you may have been using as well. For example I used to use Evernote (as well as Asana) to plan out content and keep track of ideas. However it was just another app to keep track of.
When I sat down and really thought about how I wanted to organise my online business, I decided I was going to use as little apps as possible. I realised I wasn’t using Asana to its full potential.
So here’s how I use Asana to stay organised the simplest way possible:
2.1 Tracking client projects/vendors
While running Origami Collective, I also have freelance projects that I take on occasionally. Using Asana to track these projects means I always know what stage of the process my clients are at.
Basically, Asana allows you to create ‘Projects’, and within those projects you can add tasks. You can view tasks as either a list, or a board (boards are my favourite way to organise everything!).
If you are a marketplace or directory business, you could use Asana to track your vendors and packages. For example you could add a vendor as an Asana project, and then use tasks to track social media shout outs.
2.2 Content planning
I have a project that is displayed using the ‘boards’ view where I keep track of all the content I need to create for my business. So blog posts, social media posts, products, email campaigns etc.
Each post/product is a task that I then move through the boards as I create them. This allows me to get an overview of exactly what I need to be focusing on at any one time.
2.3 Keeping track of new business ideas
I have an Asana project that is dedicated to any ideas for my online business that pop into my head.
When I get an idea I’ll add it as a task, and then within that task I can add any further notes.
This way everything is all in one place, and my brain isn’t overloaded with trying to remember everything.
Related post: How I use Asana to plan content and stop faffing
3. Tailwind
Ah social media scheduling. Everyone has their own favourite scheduler (there are heaps of them out there), but mine is Tailwind.
Sticking with the theme of ‘keeping things simple to avoid overwhelm’, I only focus on two social media channels; if that.
And that is my advice to you. As an online business owner you already have to fill many roles, you don’t also need to be stretching yourself thin trying to be active on every social media platform there is.
Pick 1-2 platforms that you are comfortable with. And that your audience uses the most. Then stick with those.
So here’s how I use Tailwind to streamline my social media posting, and avoid overwhelm.
3.1 Scheduling IG posts then auto sharing to FB
I repurpose my IG posts for FB, tailwind let’s you post to both at the same time. This means I’m not having to create original content for two different social media platforms.
I will sometimes add something different to FB that I haven’t added to IG. For example if I’ve created a new blog post I’ll add more of an excerpt to FB than I would on IG as I’ve found my audience likes to read more on FB, and scroll more on IG.
3.2 Scheduling Pinterest posts
Pin your own pins to your boards first, then use Tailwind to pin them to other boards. Pinterest likes when you spend time on its platform rather than always using Tailwind to schedule posts.
A handy feature on Tailwind is the ‘shuffle button’. This is great for when you’re bulk scheduling to different boards at the same time. You can shuffle all your scheduled posts.
Keep in mind though, Pinterest no longer likes it when you pin 100 pins a day. In 2020 they have recommended 15-20 pins a day. Even better if you can be pinning your own ‘fresh, original’ content.
When Im scheduling pins, I’ll go into the board I’m scheduling to and use the ‘more ideas’ tab to find relevant content to pin to my board. Super easy and effective.
If you’re having trouble coming up with content that your audience wants to interact with, check out my social media templates. I’ve done the research for you and created templates based on types of posts that I have seen that get good engagement.
[thrive_leads id='87585']
4. ActiveCampaign
This is one of the paid applications I use, and it’s the only one of the 5 that isn’t really mobile friendly (where’s your mobile app ActiveCampaign?!). But it’s still a very powerful tool and I would recommend it to all of my clients.
If you’re on a small budget there is a Lite plan that you can go on, made cheaper by adjusting the amount of your contacts to 500.
So here’s how I use ActiveCampaign to streamline my business:
4.1 Sending out updates
At the time of writing this post I’m currently only using AC for staying in touch with my subscribers and customers. Because I’m only attracting subscribers who are genuinely interested in the content I’m putting out I’m not pressured to be sending weekly (or even daily) emails to remind them that I’m here.
I keep it super simple for myself and my audience and just send out an update when a new post or product goes live. This way my audience doesn’t feel bombarded, and I’m not burning myself out trying to stay on top of funnels and multiple campaigns (as they’re called in AC).
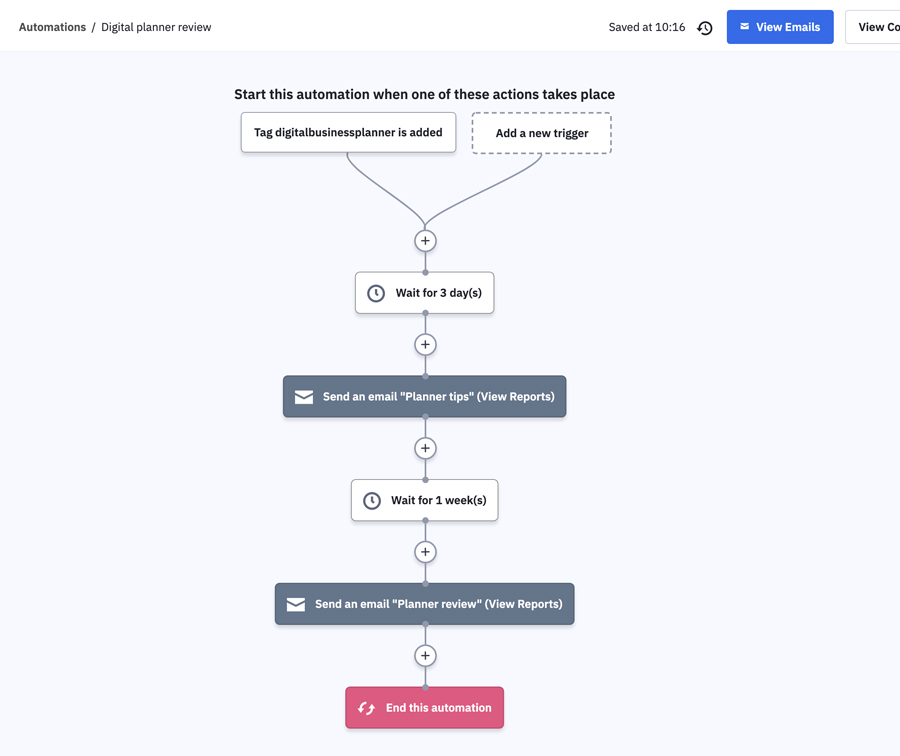
4.2 Following up with customers
I try to make everything I do about my customers as much as possible. So when someone makes a purchase I send them a quick email with some tips on how to get the most out of their template.
A week later I send out an email to ask that if they loved the template, to leave a review so that their fellow online business owners can benefit from it too.
It’s a super simple automation that’s straight to the point and gets the job done.
5. PayPal
I know a lot of online business owners have a love/hate relationship with PayPal because of the fees.
But being one of the most trusted and easy to use payment methods for my customers, I feel that it’s worth the cost. I know that if a website doesn’t let me pay by PayPal, I’m less likely to follow through with the purchase if I have to go and get my wallet (because who knows where that thing is anyway).
So aside from taking payments on my website, here’s what else I use PayPal for:
5.1 Tracking income and expenses
Create a business PayPal account using your business email address. Then use that account for any purchases that you make for your business. As well as receiving any payments from your clients/customers (see invoicing below).
That way when tax time comes you can easily see what your expenses and your income have been.
If you login to your PayPal and go to Reports > Financial summaries > Financial summary you can create a report of all your income/expenses for the financial year.
Any fees that you paid PayPal will be on the report which you can also claim as a business expense during tax time.
5.2 Invoicing
I use PayPal invoices for my freelance clients as it’s easy for them to make payments. Again, yes there is a fee for using this service. But it’s worth it if it means the payment process is easy for my clients (plus these fees can also be claimed at tax time).
You can set invoices to be able to be part paid if you require deposits on any work you do. Send invoice reminders, or even give refunds.
Everything is in the one place so you don’t need to digging through various apps to find an invoice you may or may not have sent 2 years ago.
It's time to get organised
So those are the 5 applications I use to organise my online business. And while a couple of them may be paid, I truly feel that the cost is worth it for my sanity!
If it makes your life loads easier, helps you be more productive, and less stressed, then it’s worth it. Don’t be afraid to invest in yourself and your business.
Do you use any of these applications? What do you think of them? Please feel free to share how you organise your online business in the comments below.
Why your website design needs to do more than just look good
So you run an online business, and you think your website design looks pretty good. But for some reason you can’t get people to stay on your website for very long, and you aren’t making many sales.
But why?
Or maybe you’ve built your own website, and you know the design isn’t that great, but your product is amazing, your services are top rate, and you really care about your customers. But you also don’t make many sales.
How come?
It’s because your website design is so important when it comes to actually turning viewers into customers.
And I’m not just talking about a website design that looks good. It needs to create a warm feeling, where your potential customer is put into a mind frame where they are wanting to buy.
Psychology Today has a great article on the psychology of why people buy which is well worth the read. If you can get inside your viewers mind, you can work out what it is they need from you before they are ready to purchase your product.
For those of you who want to know how this translates into website design, I’ve created a checklist of things your website design should or shouldn’t have to maximise your chance of gaining a new customer/client.
1. Your home page
Usually your home page will be the first thing someone sees when they land on your website. It is your first chance to draw your viewer in, and sell yourself.
[thrive_leads id='87585']
Keep these things in mind when creating your websites homepage:
1.1 Main header image
The most important part of your homepage is the main header image. This is where you make your first impression, and usually where someone will decide if they want to keep scrolling or leave.
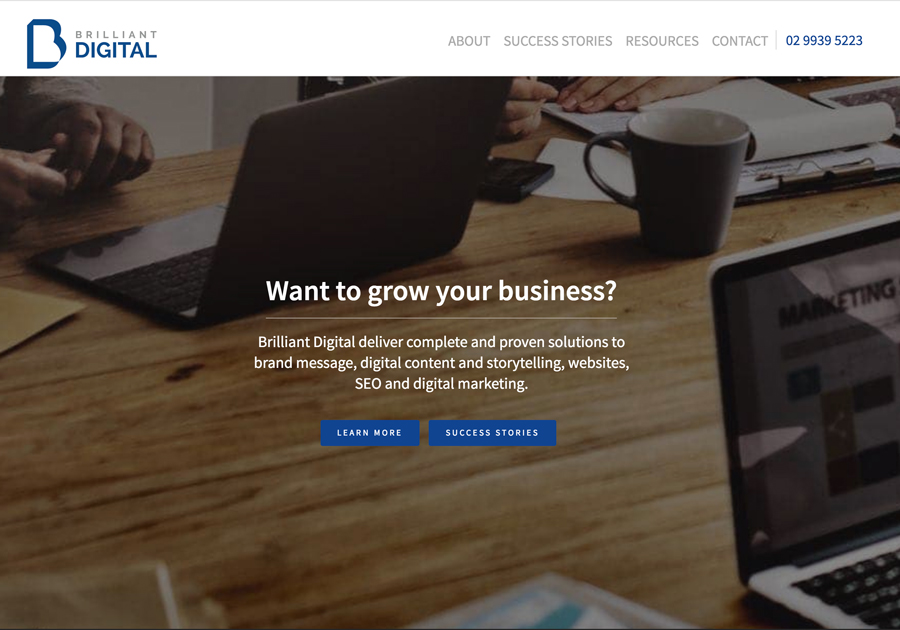
The most important thing your header needs to have is a ‘call to action’. Below are two examples of home page headers.
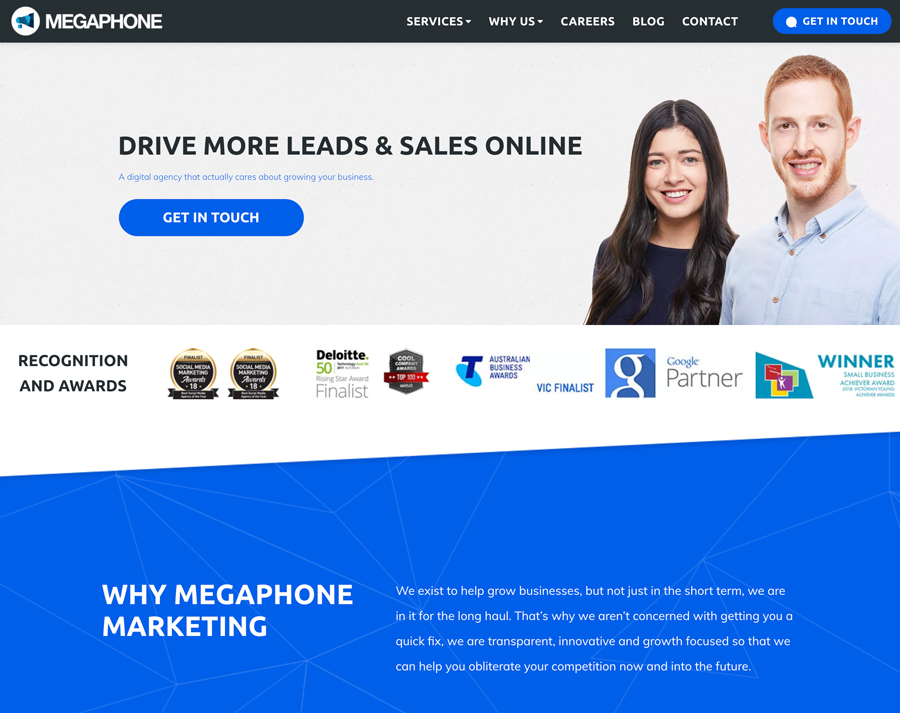
Brilliant Digital use a short and to the point headline to catch your attention. They then have two call to action buttons to choose from. The ‘success stories’ button is a great addition as it gives social proof that they can do what they are saying they can do.
This next home page header, whilst it looks nice, it doesn’t really draw the viewer in and doesn’t really excite the viewer enough to want to click the ‘view more’ buttons.
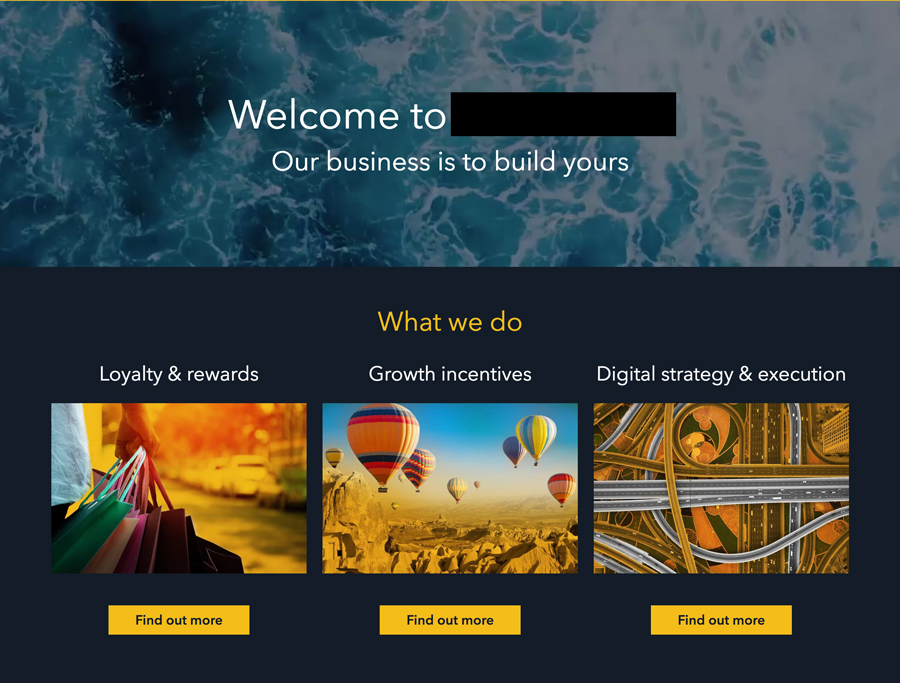
The other big difference between the two headers is that the first one is audience focused. Their focus is their viewers business, rather than speaking about their business.
A pretty picture as your header image is not enough to make sales!
Also, as tempting as it is to create a slideshow of images to get in as much information as you can, your best bet is to use just one image. Assume your audience is time poor, they don’t have time to sit and watch a slide show of images.
Instead, use your one best image as your header image, and then you can break up your home page with further images that are relevant.
1.2 Talk about benefits, not features!
A great way to sell your product or service is to talk about your customer.
Sounds kind of backwards right?
But think about it. Your audience is there to see what you can do for them. They want to know how your product or service will solve the problem they are having. How will it benefit their life?
Here’s an example of a description for gumboots that is feature driven:
- Made from rubber
- Yellow colour
- Sizes XS-XL
And here is a description that is benefit driven:
- These rubber gumboots will protect your feet from getting wet, whilst bringing brightness to a dreary day with their yellow colour.
- They come in a range of sizes so you can be comfortable as well dry!
Which one makes you want to buy the gumboots more?
Keep this in mind when creating the content for your homepage. As this is your first contact with your audience, you want to add as many benefits of your product or service as possible.
You can break up these benefits with images, recent blog posts or banners. Don’t be afraid of having a long home page! The more a viewer has to scroll, the longer they will be on your website.
Megaphone is a perfect example of a longer home page that keeps you wanting to scroll as they speak about the benefits of their services, instead of their features.
2. Where to put links to your social media accounts
I see a lot of websites with social icons in their main header menus, or even in the ‘top bar’ of their websites.
But why would you want someone to leave your website as soon as they land on it?
Yes, you want to build up your social following. But you also want a user to spend some time on your website before they go to your social media accounts and get sucked into the social media black hole.
A better place to put links to your social media accounts is in your footer, where they can still be found by website viewers. But also not distract them from your content.
Related post: How to organise your online business to avoid overwhelm & maximise your time
3. Your branding is important
Why is branding important? Because it builds trust with your audience.
A website that doesn’t have clear branding will appear confusing to your audience, and give them the impression that your products/services are low quality.
A website with good branding will have the following things:
3.1 Only use up to two different fonts throughout your site
If you can, you want to use at least one of the fonts that has been used in your logo throughout your site. Providing the font is legible of course.
If you can’t use the same font as your logo, go for a similar font. So for example, if your logo uses a serif font, use a serif font on your website.
Avoid script fonts that are hard to read!
You then want to use your chosen website fonts throughout the rest of your digital design materials. Like Facebook and Instagram posts, your media kit etc.
3.2 Only use up to four colours throughout your site
Again, you want to use the colours that are in your logo so that you have consistent branding.
If your logo only has one or two colours, you can visit Colour Lovers and get some inspiration for colours to pair together.
Make sure that you are choosing colours relevant to your business and appealing to your audience though.
If you are selling kids toys for example, bright, fun colours would be more appealing compared to blacks and greys.
3.3 Keep your images consistent
Choose a theme you would like your website images to have and stick with it.
This could be images with bright lighting, images that are moody, or images that follow a colour theme.
If you have access to Photoshop, a great idea would be to add the same colour overlay or filter to all your main website images to create a really strong consistency.
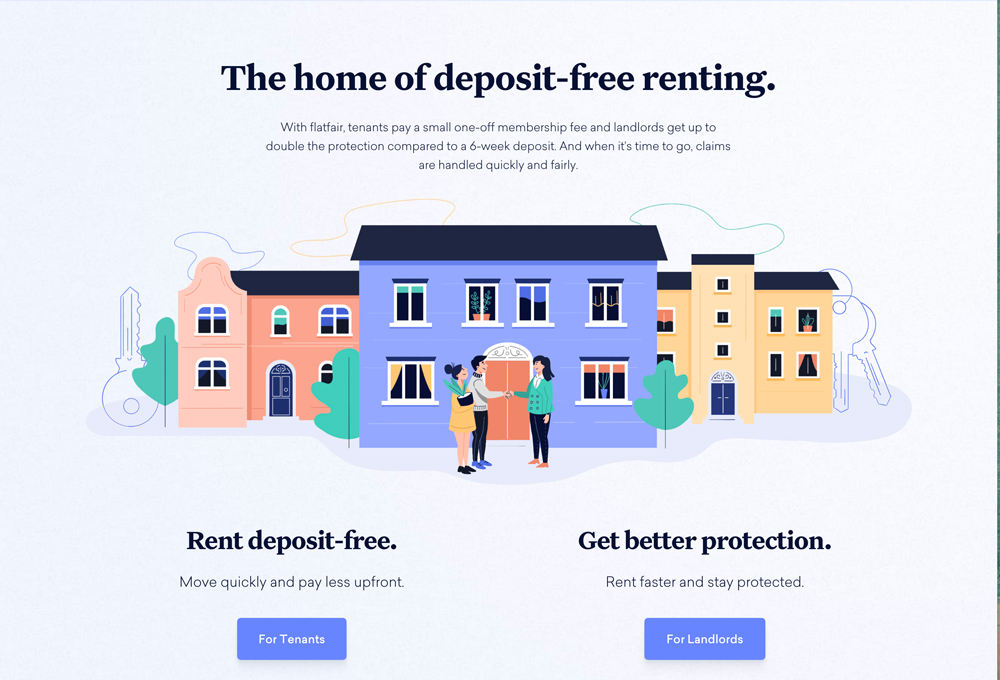
Flatfair has opted for fun vector images throughout their site rather than images of actual people. By using the graphics they have created a really strong brand, and come across as trustworthy and organised.
4. You should have a mailing list and an easy way for customers to sign up
Do you have a mailing list? A mailing list is a collection of your customers (or potential customers) email addresses, and it is super important.
Because what is the use of launching a new product or service and not having anyone to launch to?
The important thing though, is to make sure that your mailing list sign up form is easy to locate, and also appealing to your audience. People are a lot less willing to give up their email these days, so you need to make it worth their while. However you also only want to capture emails of people who are actually interested in your content! There's no use having a mailing list of 5000 people who never open your emails.
My mailing list opt-in form is direct and to the point. I have chosen not to swap a freebie for email addresses, but rather give my freebie away for, well....free. As I only want subscribers who will benefit from my content, it's a win win for both of us. Here's my opt-in form again just in case you skimmed passed it up there ^:
[thrive_leads id='87585']
5. Test your website on mobile view!
So you’ve created your website design and it looks great on your computer. But how about other devices?
If you aren’t using it already, I would highly recommend installing Google Chrome on your computer. It allows you to see what you website looks like on other drives.
You just need to right click anywhere on your website and select ‘inspect’. You then select the device icon from the top menu bar (circled in red on my screen shot below). This button allows you to toggle between desktop view and mobile view:
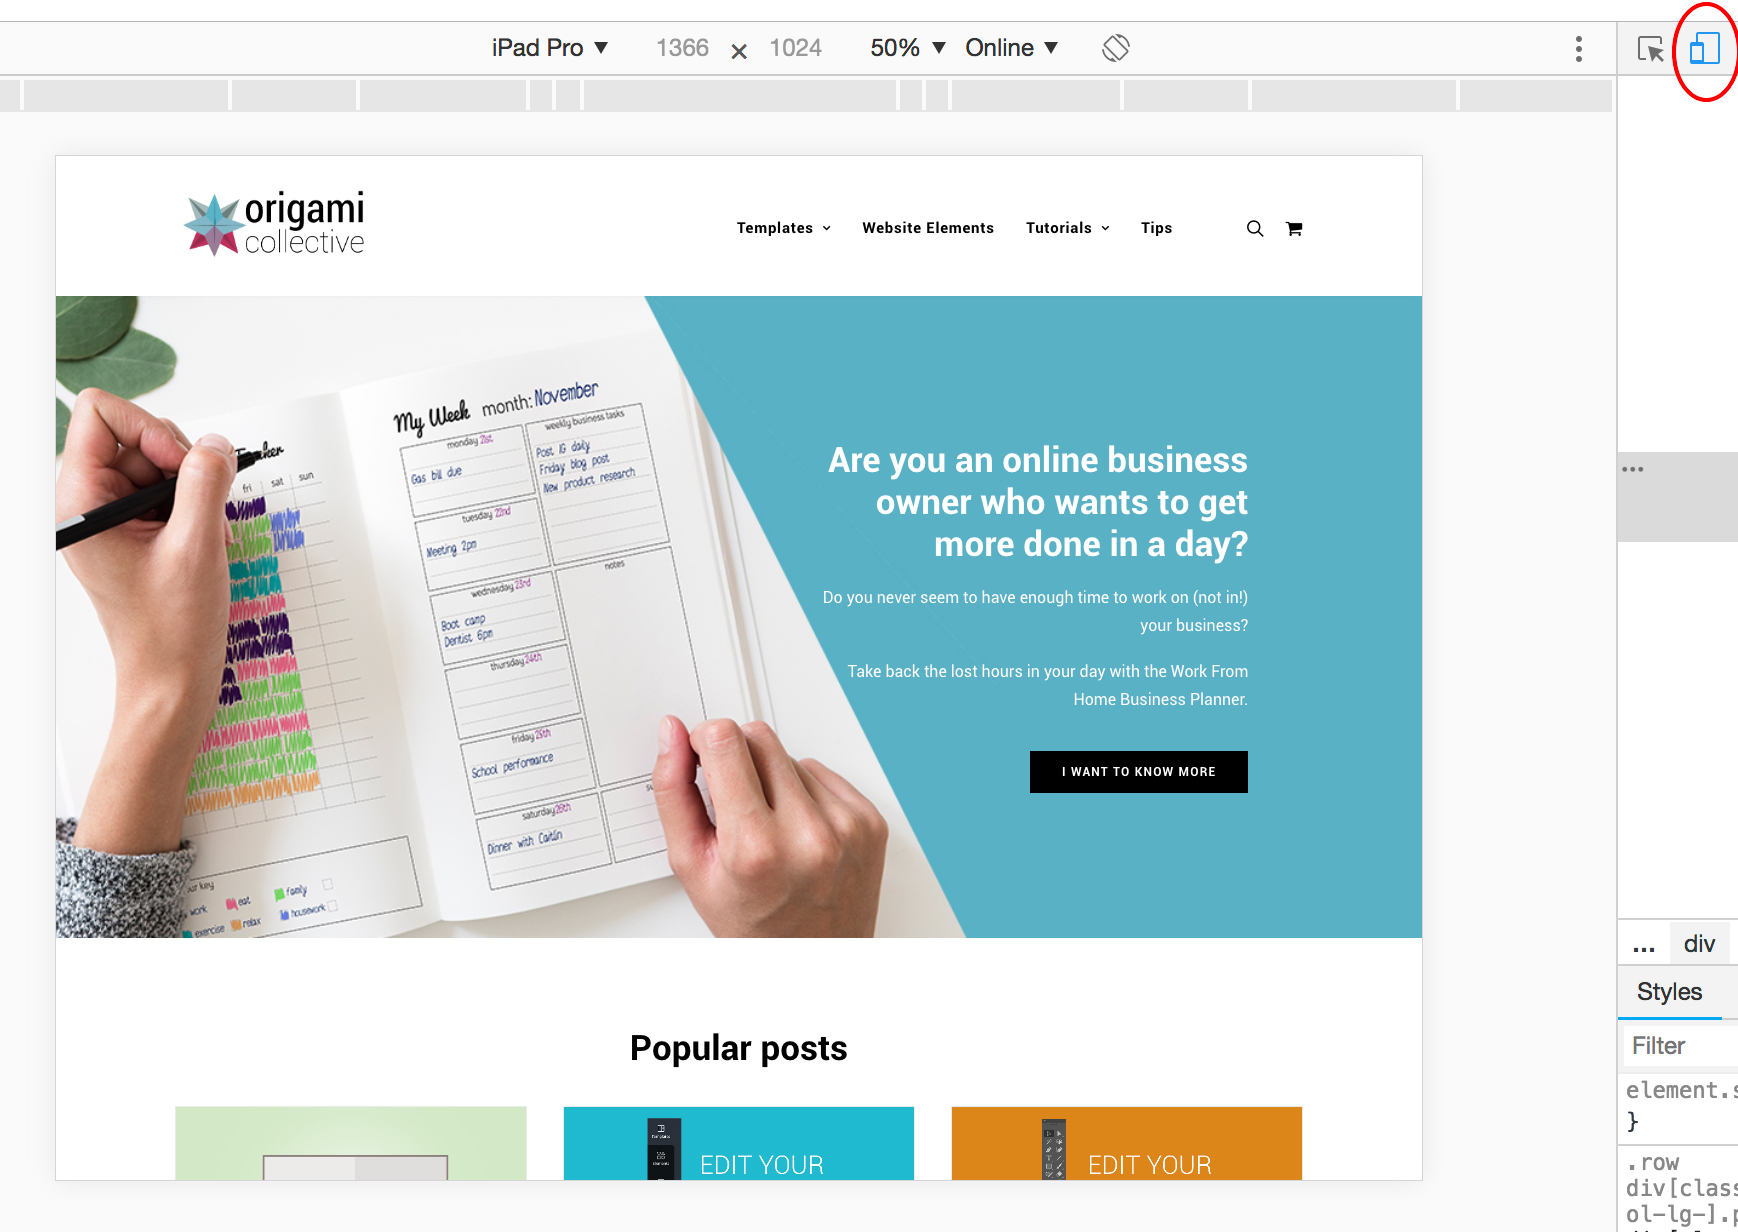
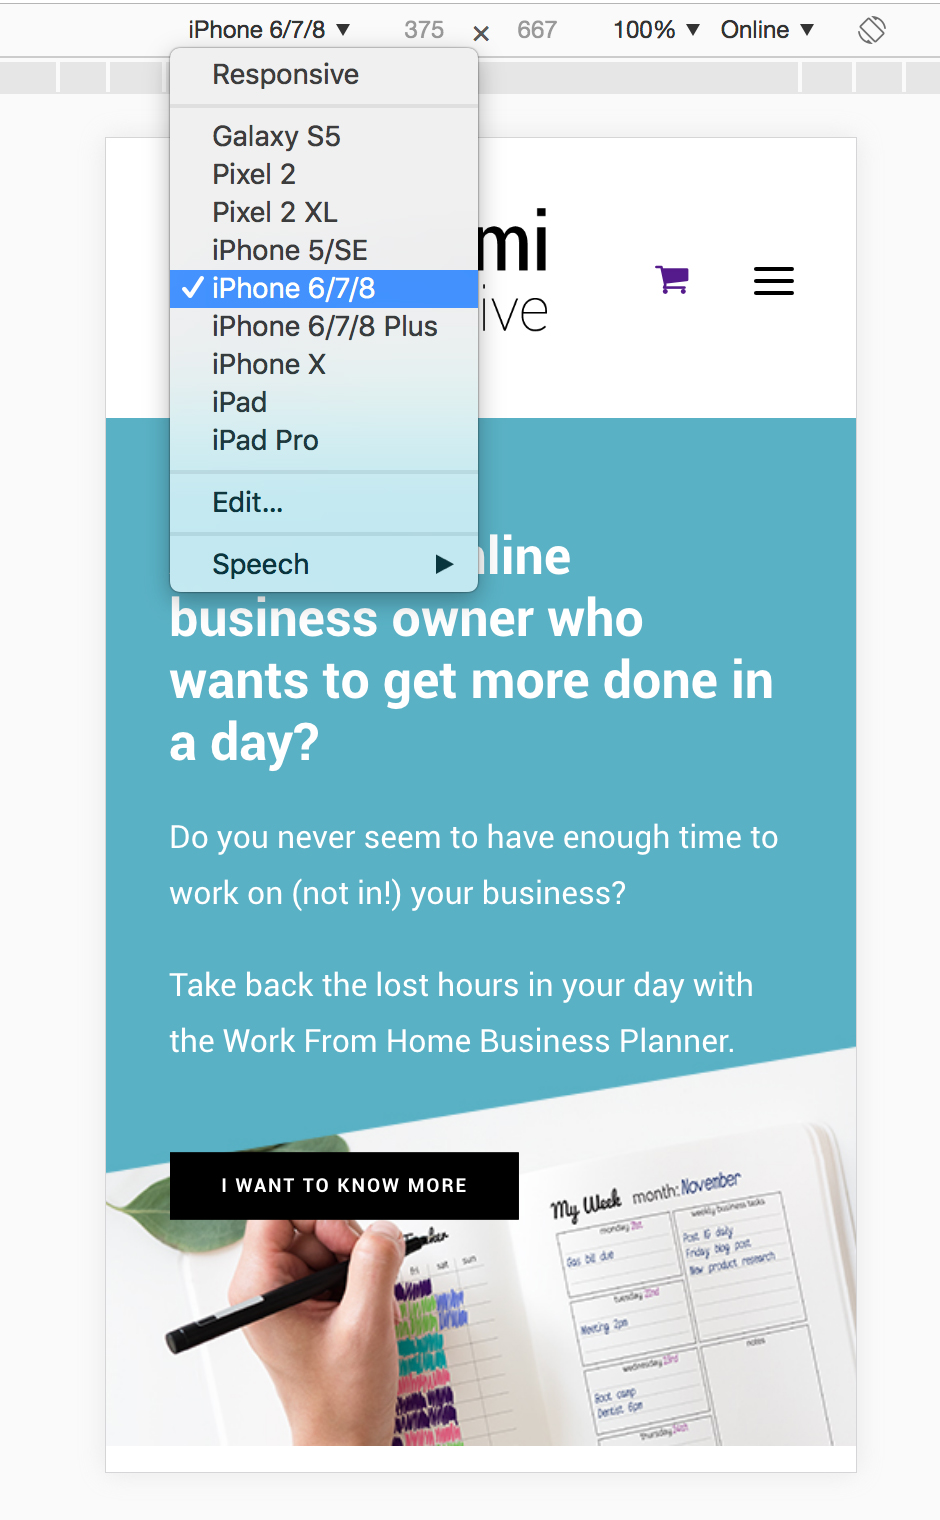
You can then use the drop down box to select from different mobile devices:
Whilst it would be really time consuming to get your site looking perfect on every device, I would at least make sure that your site is 70% there across all devices.
6. Back yourself by investing in your business
Whilst this isn’t so much about your website design, I still feel that it is a really important point.
When I created my first website design a few years ago, I went with a free WordPress theme and spent hours and hours on custom coding just to get it to look how I wanted it to look.
I also spent hours and hours searching for the perfect free stock image.
I opted for the cheapest hosting there was, and my website was sloooooooow.
See where I’m going with this?
When you are running your own online business, time is money. What is your time worth?
Would you be better off buying that $60 theme that is absolutely perfect and has a one click demo install so you can get up and running right away. Or would you prefer to spend hours on a free theme like I did, when I could have actually spent that time creating content and products to sell!
Your business may not be making any money yet, but that is exactly why every single minute of your time is precious. And for me, anything that saves me a bit of time is worth the money.
Care to share your website design?
If you’ve recently launched your own website, or redesigned an old website, I would love to see it! Pop down a link to it in the comments below, and let me know what you love about your website design!
The time management tips you probably haven't heard
When I first started my online business I had no idea what time management was.
I had no idea what I was doing, and I was always feeling overwhelmed, stressed and short on time.
I didn’t have any systems in place. I was so used to working for someone else that I realised I didn’t know how to maximise my time whilst running my own business.
After a few years in business though, I have picked up some time management tips that I have found surprisingly useful. These tips have helped me not only manage my time better, but also avoid the overwhelm.
Why should you bother with time management?
If you are an online business owner, there’s no one paying you a salary. No one paying you while you sneak a scroll through social media on your phone, or take an extra long toilet break (we’ve all done it).
Every minute counts.
You may also not have the funds to outsource anything at the moment, so you’re doing it all on your own.
Managing your time is important so that you can make the most of your short hours. Produce your best work. And also avoid burning yourself out.
1. Focus on one thing at a time
This may sound counter intuitive, but think about how you feel when you are trying to get many things done at once.
Are you focused and producing your best work? Or are you spread thin, distracted, and making small mistakes because your mind is always elsewhere?
I have found that if I pick one thing to focus on that week, I get it done not only quicker, but better.
Choose one thing you want to focus on for the week, be it blog posts, social media posts, or learning a new skill.
Spend the whole week on that task. Write a few blog posts, schedule all of your social media posts for the month. Whatever it is, focus all of the time and energy you have into it until you have completed the task you set for yourself.
And if you happen to finish your set task, you will have the headspace and time to move onto the next one.
2. Take an hour lunch break
Have you ever been sitting at your computer working, looked up and realised it was 3pm and you hadn’t had lunch yet?
I sure have.
I would power through and work all day, and although I would be getting everything done, the quality of my work suffer. I was burning myself out, and denying my body the things it need to function at 100%.
I would have trouble focusing, and things would take double the amount of time that they usually would. Does anyone else find it hard to concentrate on work when they are hungry?!
So I told myself that I would start making sure that I took a lunch break. An HOUR lunch break.
I start my lunch break with a 30 minute walk outside. Walking does wonders for your health, and energy and I would strongly recommend adding it to your lunch time break. This article covers 5 reasons why you should walk on your lunch break.
I listen to podcasts while I walk too, so anything from Kerwin Rae, to Melyssa Griffin. Listening to business podcasts gets me motivated to put out my best work when I get back to my desk.
I then make sure I eat lunch AWAY from my work desk. I like to sit and eat on the floor (sitting on the floor cross legged is great for your back if you are sitting on a desk chair all day), but you could sit outside or even at your dining table.
Just make sure you are away from your desk to give your mind a chance to refresh.
After spending an hour away from my desk, I find that I’m more focused, and way more productive. And the more productive I am during my time, the more tasks that I can fit into a day.
[thrive_leads id='72553']
3. Say no to more things
Working for yourself you may feel like you need to say yes to everything. Because saying no to money seems crazy right?
But what if saying yes to everything means staying up until 2am, bleary eyed and stumbling through your work hoping you don’t make a type in tomorrow's Facebook post?
You don’t need to say yes to every job if it means you are spread so thin that your tasks are not getting the full attention that they deserve.
Or worse still, your tasks aren’t getting completed and you are moving nowhere.
If your plate is already full, it is ok to say no (or ‘not right now’ even). You will feel better for it, and you will be able to manage your time better without having to squeeze in extra work.
4. Be satisfied with 70% perfect
So I recently redesigned the Origami Collective website, and I’m embarrassed to say that it took me a whole YEAR to do. Yes, 1 year to redesign my website (update for 2020, I'm in the process again of rebranding my site however it has been a much quicker process this time around as I've been following my own advice).
And it was because I wanted it to be absolutely perfect. So I kept tweaking and adjusting, and then also getting side tracked at all the things I could do instead of xyz.
But it got to the point where I thought “I am never going to feel like it’s perfect”, and I launched it anyway.
Related post: Why your website design needs to do more than just look good
My need for it to be perfect was holding me back, and also taking up all of my precious time!
I could have launched months ago, and I have missed out on potential income because of my need for everything to be 100% perfect.
Have you ever spent hours and hours creating the ‘perfect’ social media post, to not be happy with the final result anyway? Or have you spent hours trying to make one thing on your website look right, when you could have been working on bringing in new clients?
You are your own worst critic! Being satisfied with 70% perfect doesn’t mean putting out something that is shit. It just means putting out your best work, and if it’s not the right shade of green, or doesn’t have 1587 characters exactly, it doesn’t matter!
Because majority of the time, 70% perfect to you, is actually 100% perfect to your audience as they don’t see the imperfections that you see. All they see is the value you can provide them.
If you give any of these tips a go, or have any time management tips you would like to share, feel free to drop a comment below and let me know!